How to Use Polygonscan
The article is a detailed guide to using Polygonscan, covering topics like tracking transactions and understanding smart contracts on the Polygon network.
Polygonscan is a very useful block explorer tool for those who use the Polygon blockchain as it allows them to track, analyze, or verify transactions or smart contracts. Understanding how it works and what all of its features are is important so you can take full advantage of it!
What is Polygonscan?
Polygonscan is a block explorer for the Polygon blockchain. You could look at it as a search engine and analytics platform for anything that happens on Polygon. As the activity on the network grew exponentially, the team behind Polygon teamed up with Etherscan to provide an alternative to the Ethereum Explorer.
What Are Polygonscan’s Main Uses
If you have used Etherscan before, you will find many similarities between the two explorers. With Polygonscan, you can, amongst others,:
- Keep track of MATIC, the chain’s native token
- Search for and analyze addresses and transactions
- Track gas prices
- Track specific addresses
- Verify smart contracts
- Set notifications for activity on watched addresses
- Conduct research into trading & investing
- Track NFTs
Understanding Polygonscan’s Homepage
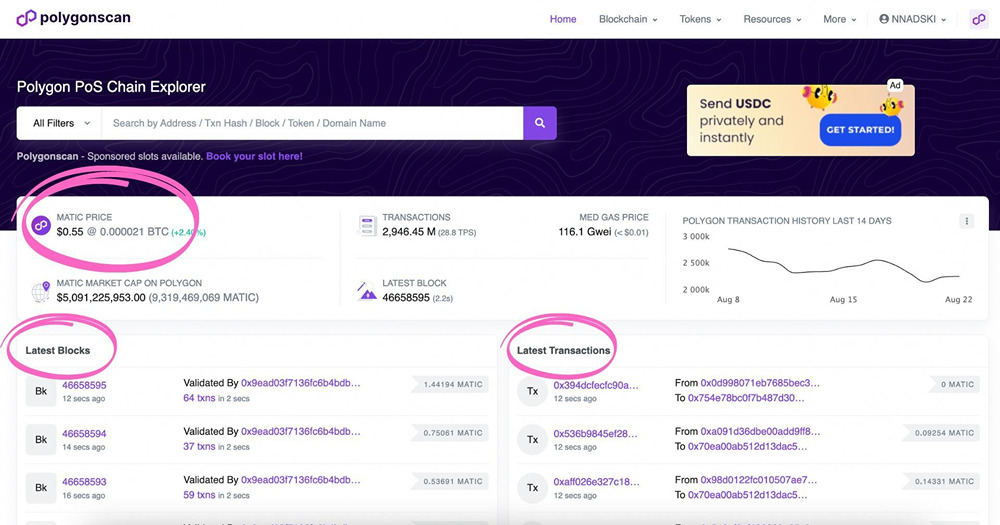
When you first open Polygonscan, you will see an overview of the MATIC token, the chain’s native token. Additionally, you see the latest activity on the network, split by blocks and transactions.
Using the search bar, you can look up a transaction, address, a token, or a smart contract, e.g.
In the top right corner, you have handy dropdown menus where you can explore additional services and tools offered, as well as resources like stats.
Understanding Address Pages on Polygonscan
Using the search function allows you to see information about individual addresses. When you open the address page, you will see the following information at a glance:
- Balance in MATIC
- The value of MATIC tokens held in USD
- The value of other tokens held by the address
- Address activity (transactions for fungible, as well as non-fungible tokens & analytics)
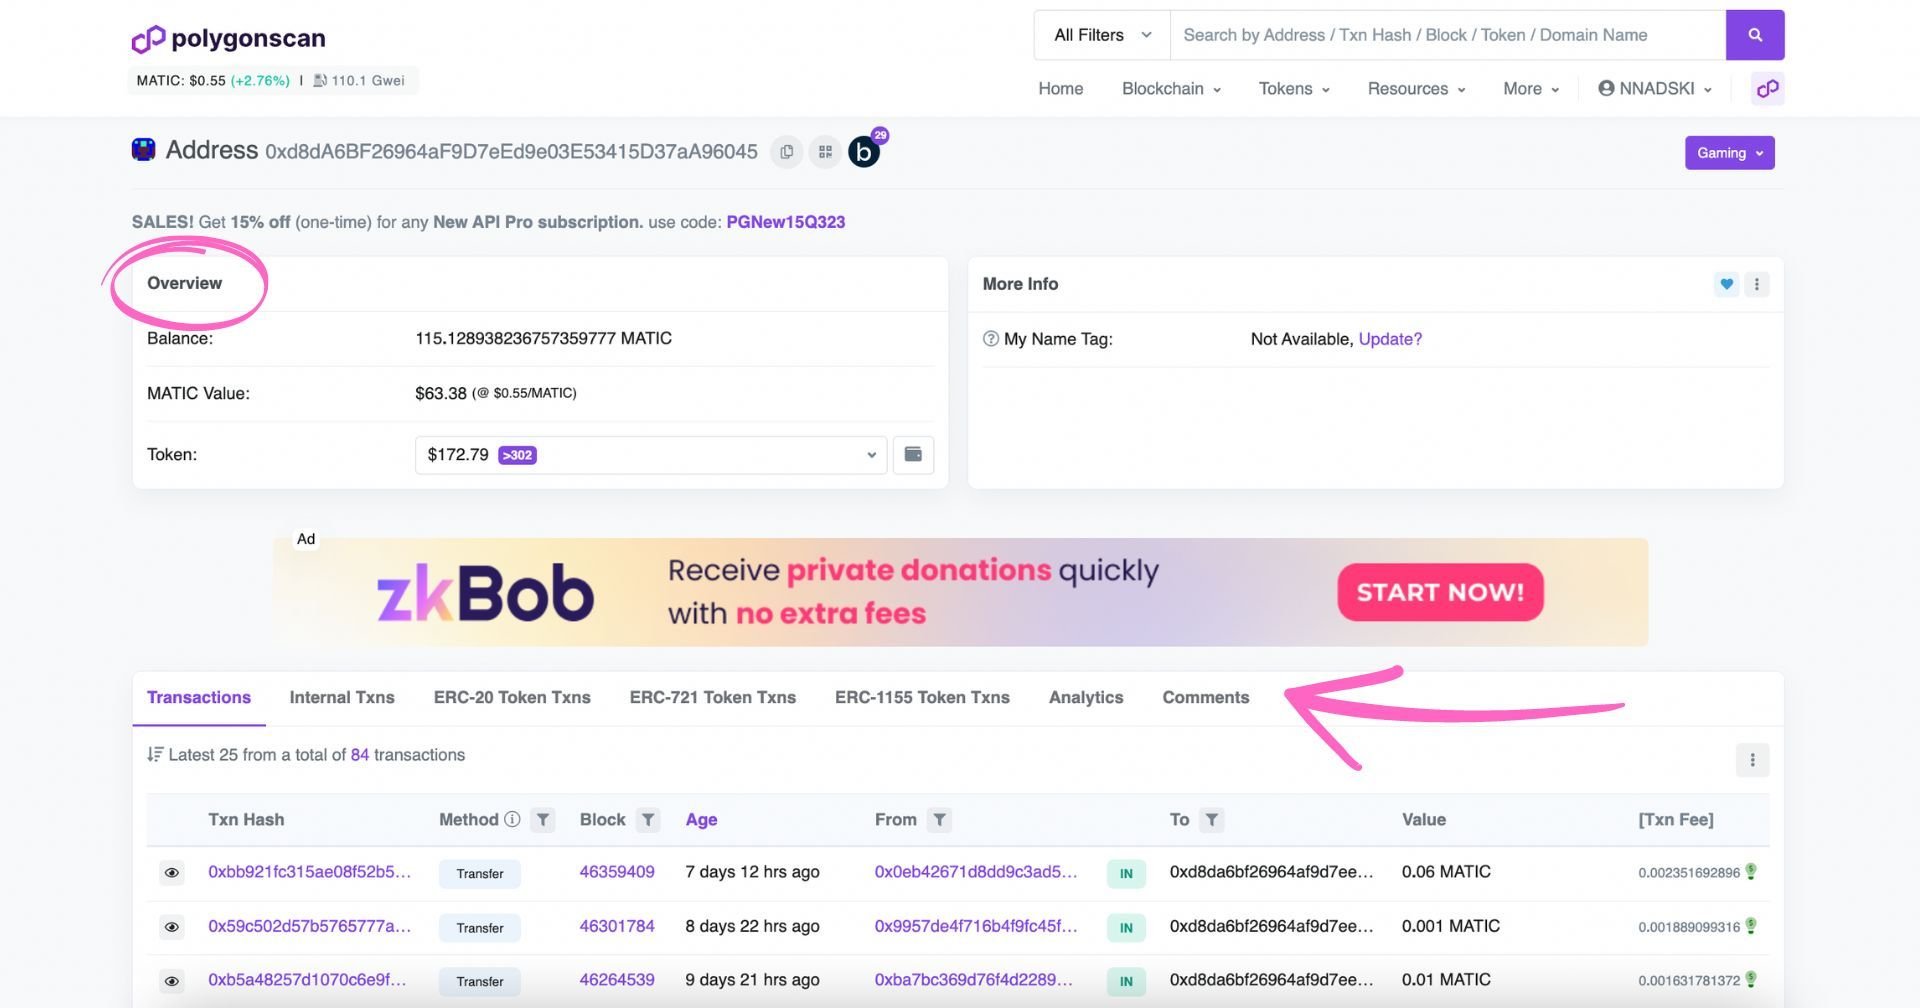
The transactions are split by type: ‘Transactions’ are usually triggered by external addresses (e.g., user wallet). ‘Internal transactions’ are triggered by smart contracts, and ERC-20, ERC-721 (NFTs), and ERC-1155 token transactions show any transactions involving these types of tokens.
How to Read Transactions on Polygonscan
You can retrieve transactions by searching for them directly using the hash (or the transaction ID) or the block or wallet address. Transactions are any actions that can be performed on-chain, not just a simple transfer, e.g., but can be a smart contract deployment or a mint of an NFT.
Reading the Transaction Page
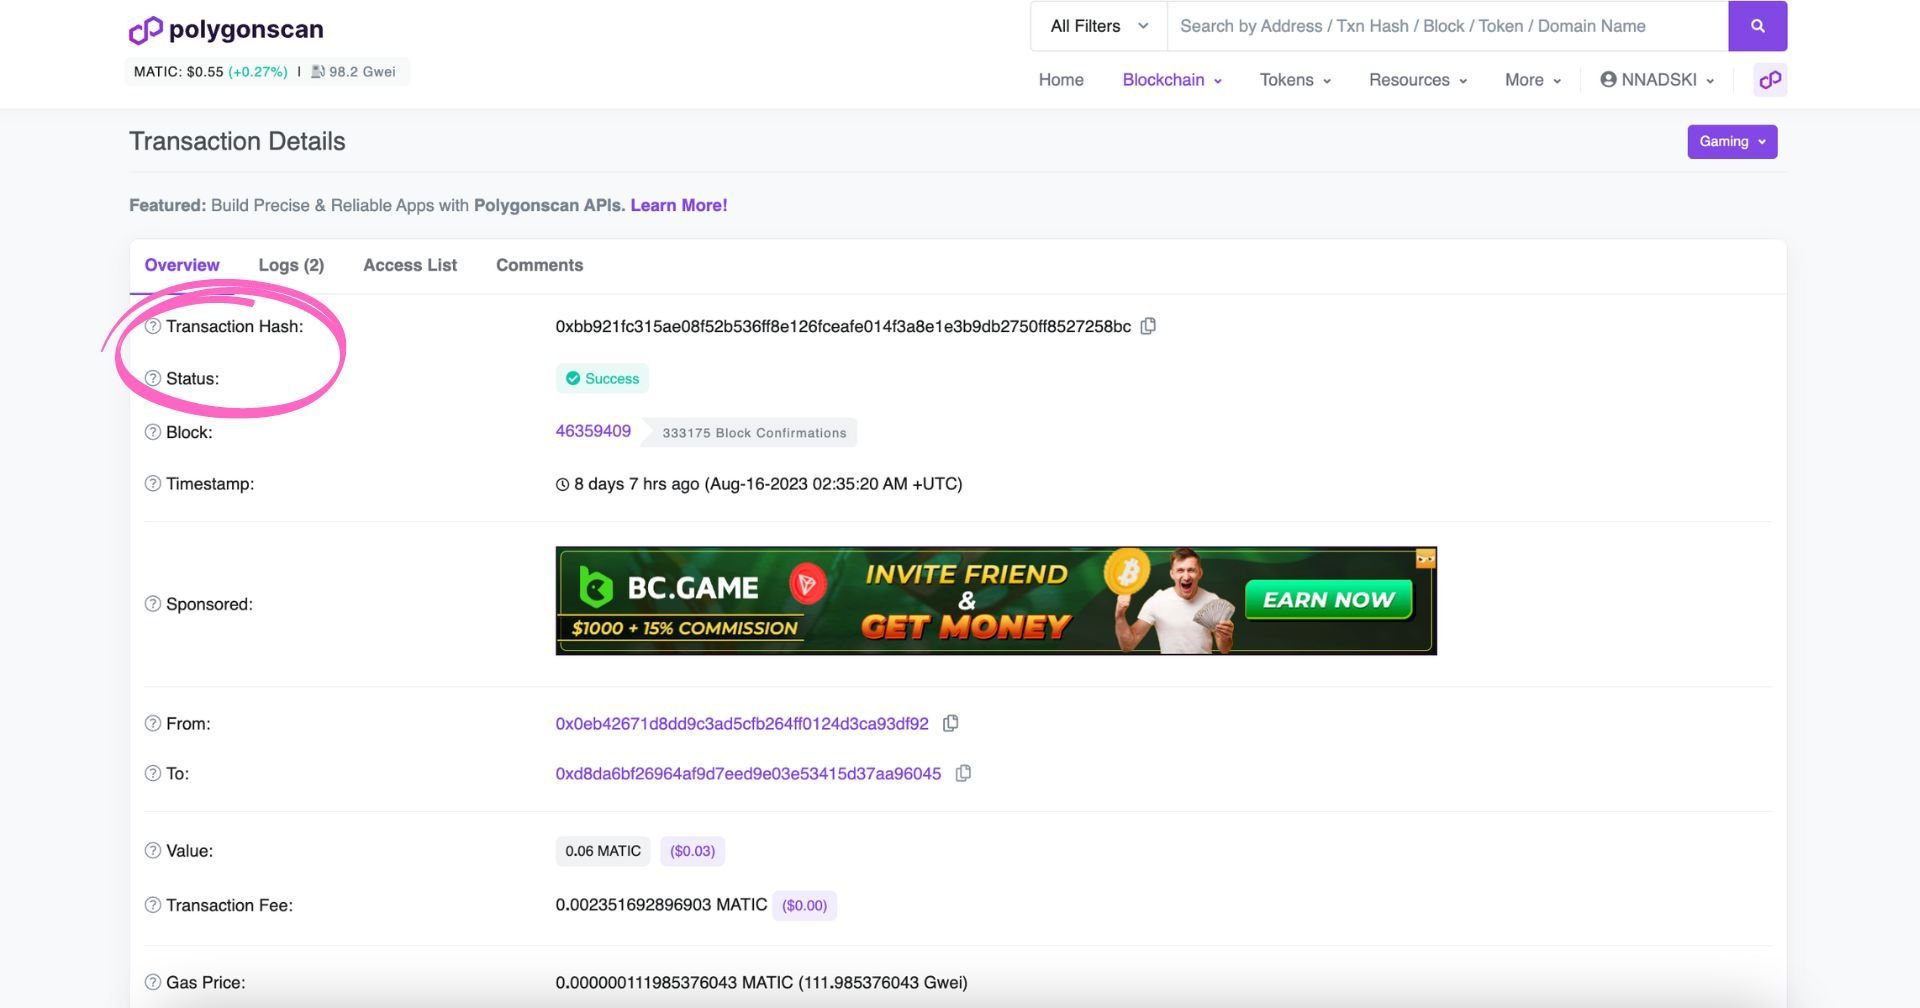
When you open a transaction, you will see an overview. It contains the following information: the unique transaction hash, the transaction status, which block it is a part of, the time of the transaction, the address that initiated it, the destination address (or the smart contract it interacted with), as well as any fees and gas spent:
Reading the Transaction Status
The status of a transaction can be:
- Pending - meaning it hasn’t been written on a block yet but is in the process of doing so
- Success - already written on a block, on-chain
- Fail - transactions can fail or be rejected due to gas fees or technical 3rd party issues (e.g., dApps), in which case they are not executed on-chain, and the user needs to redo the operation. You can read more about possible reasons for a transaction to fail in this article on Polygonscan’s support page.
Understanding Blocks on Polygonscan
Blocks on Polygon, same as on Etherscan, are numbered in ‘order of appearance.’ The oldest block would be block 0, the next one 1, and so on. The number of the block is actually referred to as the ‘Block Height’ - indicating its position in the order of blocks on the chain.
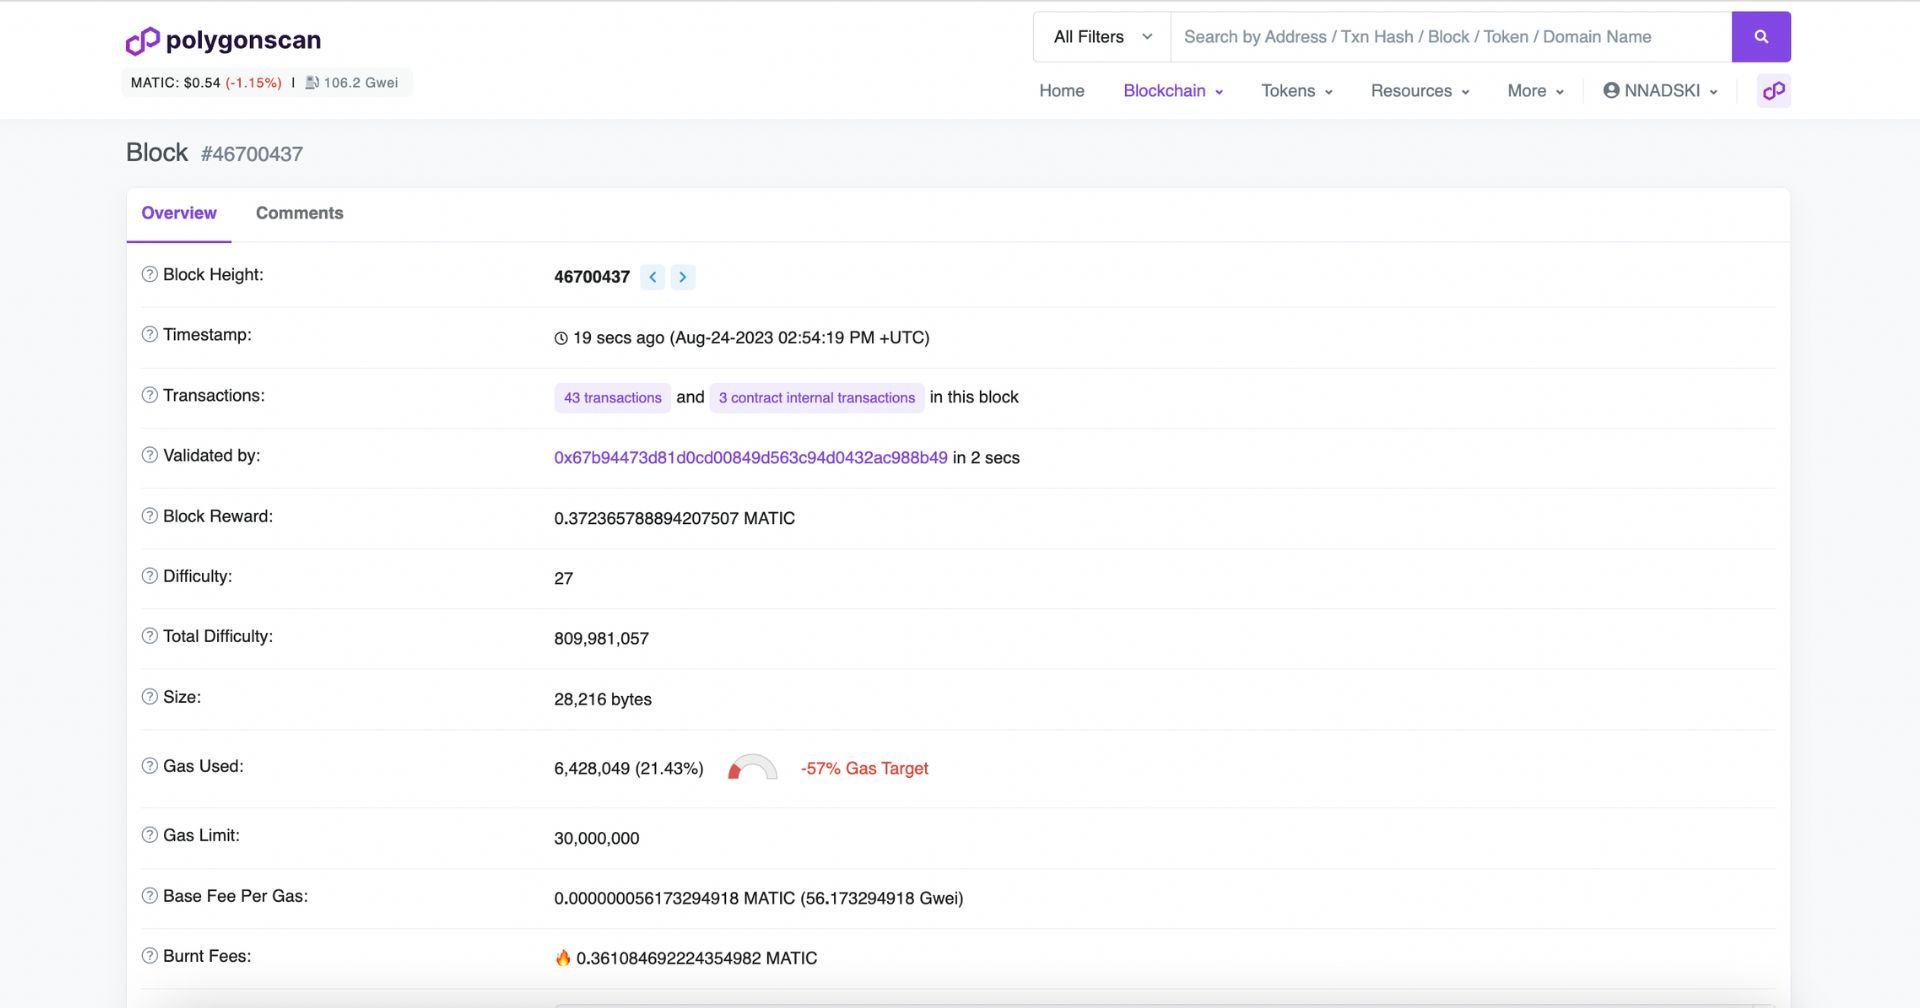
When you open a block, you would see its Height, timestamp, how many (and what type) of transactions it contains, who validated it, what the gas usage was, etc.
Understanding Smart Contracts on Polygon
Polygonscan offers two options: to read or to write smart contracts. Writing allows you to interact with the contract. However, please note that it is still in Beta, so we recommend you apply caution because this feature is provided on an "as is" and "as available" basis. PolygonScan does not give any warranties and will not be liable for any direct or indirect loss through continued use of this feature.
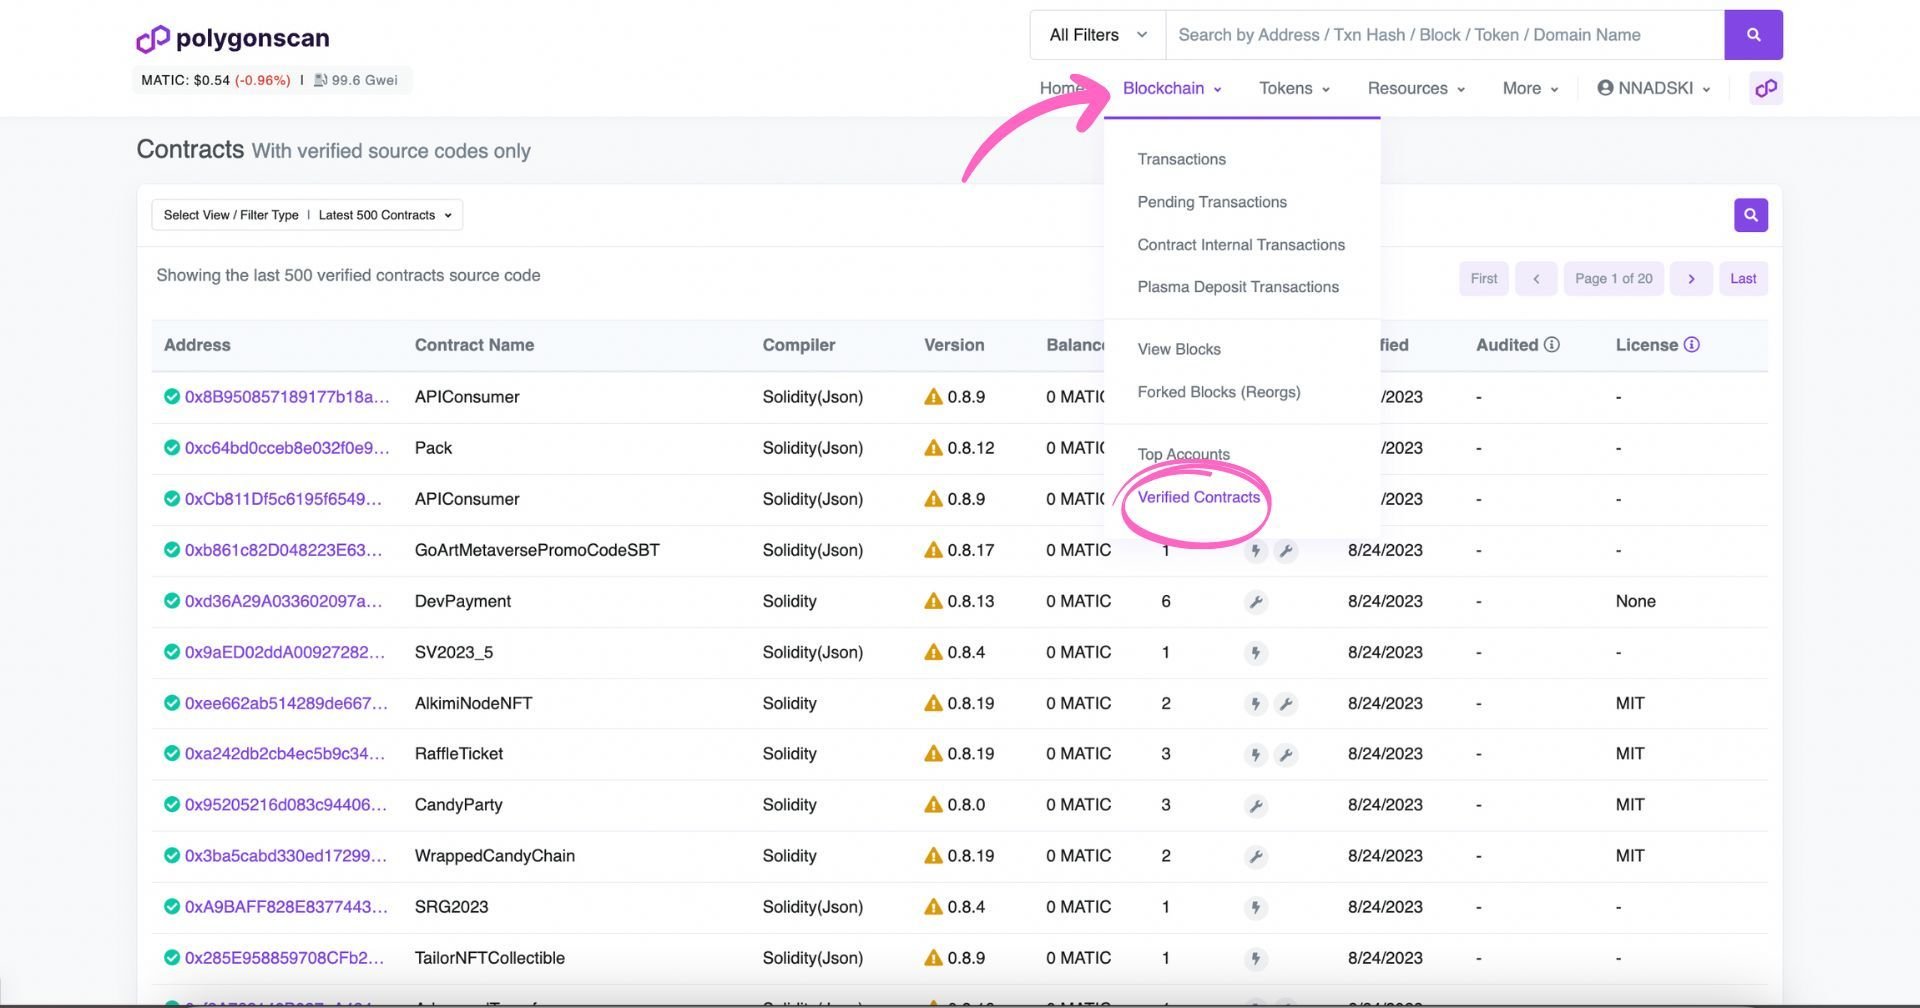
Reading smart contracts allows you to check the code without changing it. You can see all verified smart contracts by clicking on ‘Blockchain’ and then selecting ‘Verified Contracts’ as shown below. Not all smart contracts are verified: you can use this information when researching which are trustworthy.
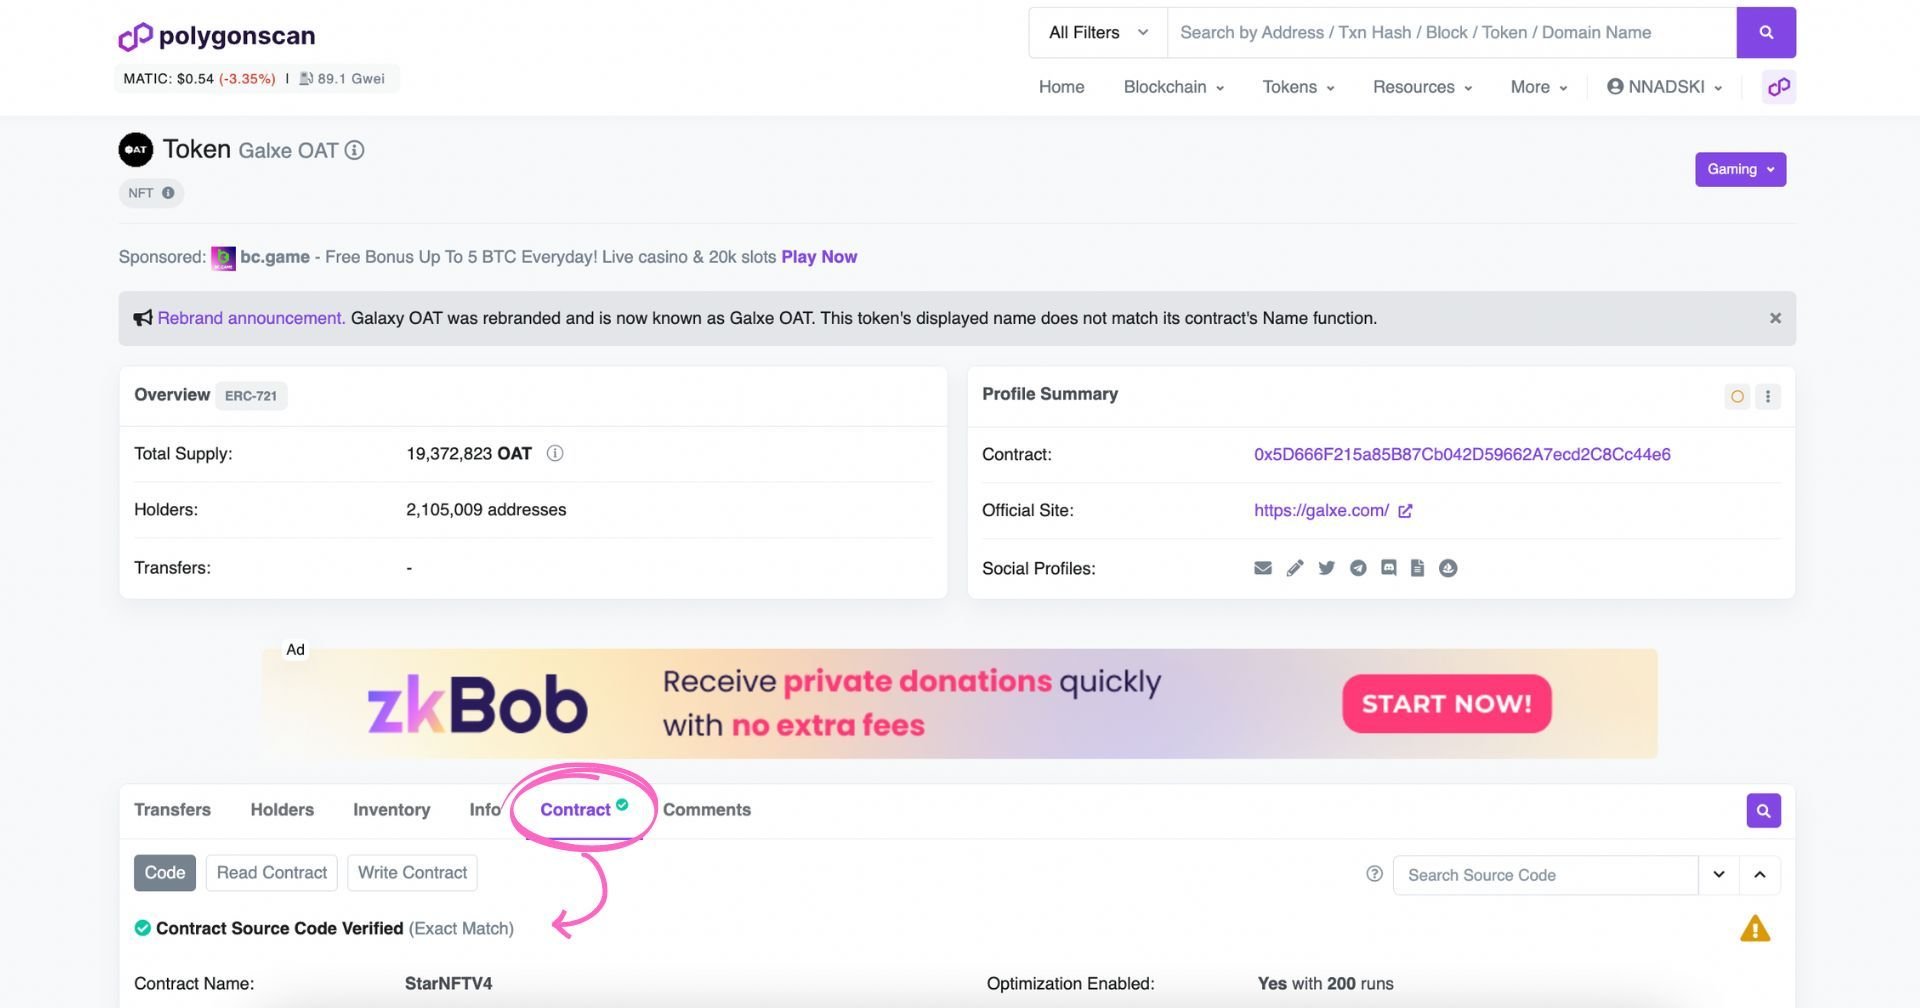
Furthermore, you can check if a specific contract is verified by simply opening the individual smart contract page and clicking ‘Contract’:
Understanding Gas Data on Polygonscan
When you’re looking up a transaction, you will also have data about the gas price, usage, fees, etc.
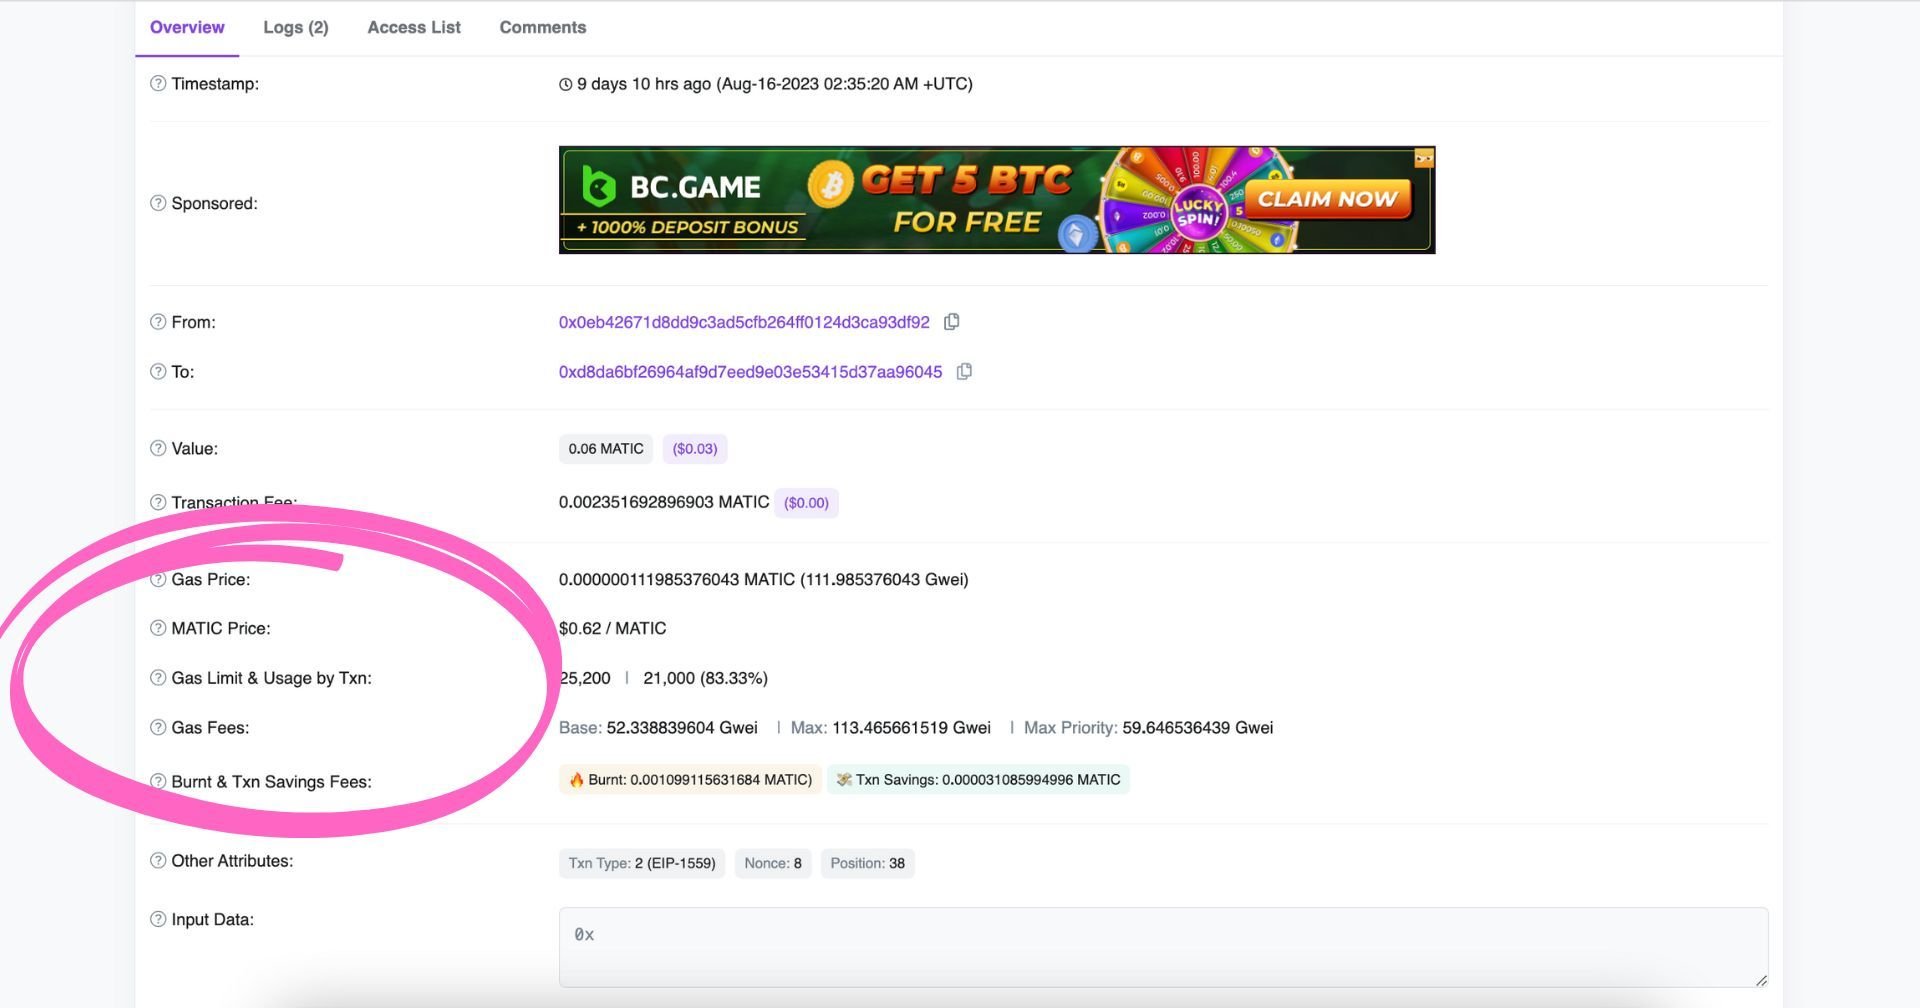
Here’s what all this means:
- Gas Price: cost per unit per gas specified for the transaction in MATIC and Gwei. The higher the price, the higher the chance of being included in a block.
- MATIC Price: The closing price of MATIC on the transaction date.
- Gas Limit & Usage by Txn: Maximum amount of gas allocated for the transaction & the amount eventually used. Contracts involve higher values than simple token transfers.
- Gas Fees: Base fee refers to the network’s base fee at the time of the block, while Max fee and Max priority fee refer to the maximum amount a user is willing to spend on the transaction & give to the miner, respectively.
- Burnt & Txn Savings Fees: Total amount of MATIC burnt from this transaction and total fees saved from the amount the user was willing to pay.
How to Read Tokens on Polygonscan
Polygonscan currently supports ERC-20 (non-fungible tokens), ERC-721 (NFTs), as well as ERC-1155 (multi-token standard) tokens. When you go to a token page (from the Search, e.g.), you will see a token Overview, a Profile Summary, as well as additional information further down:
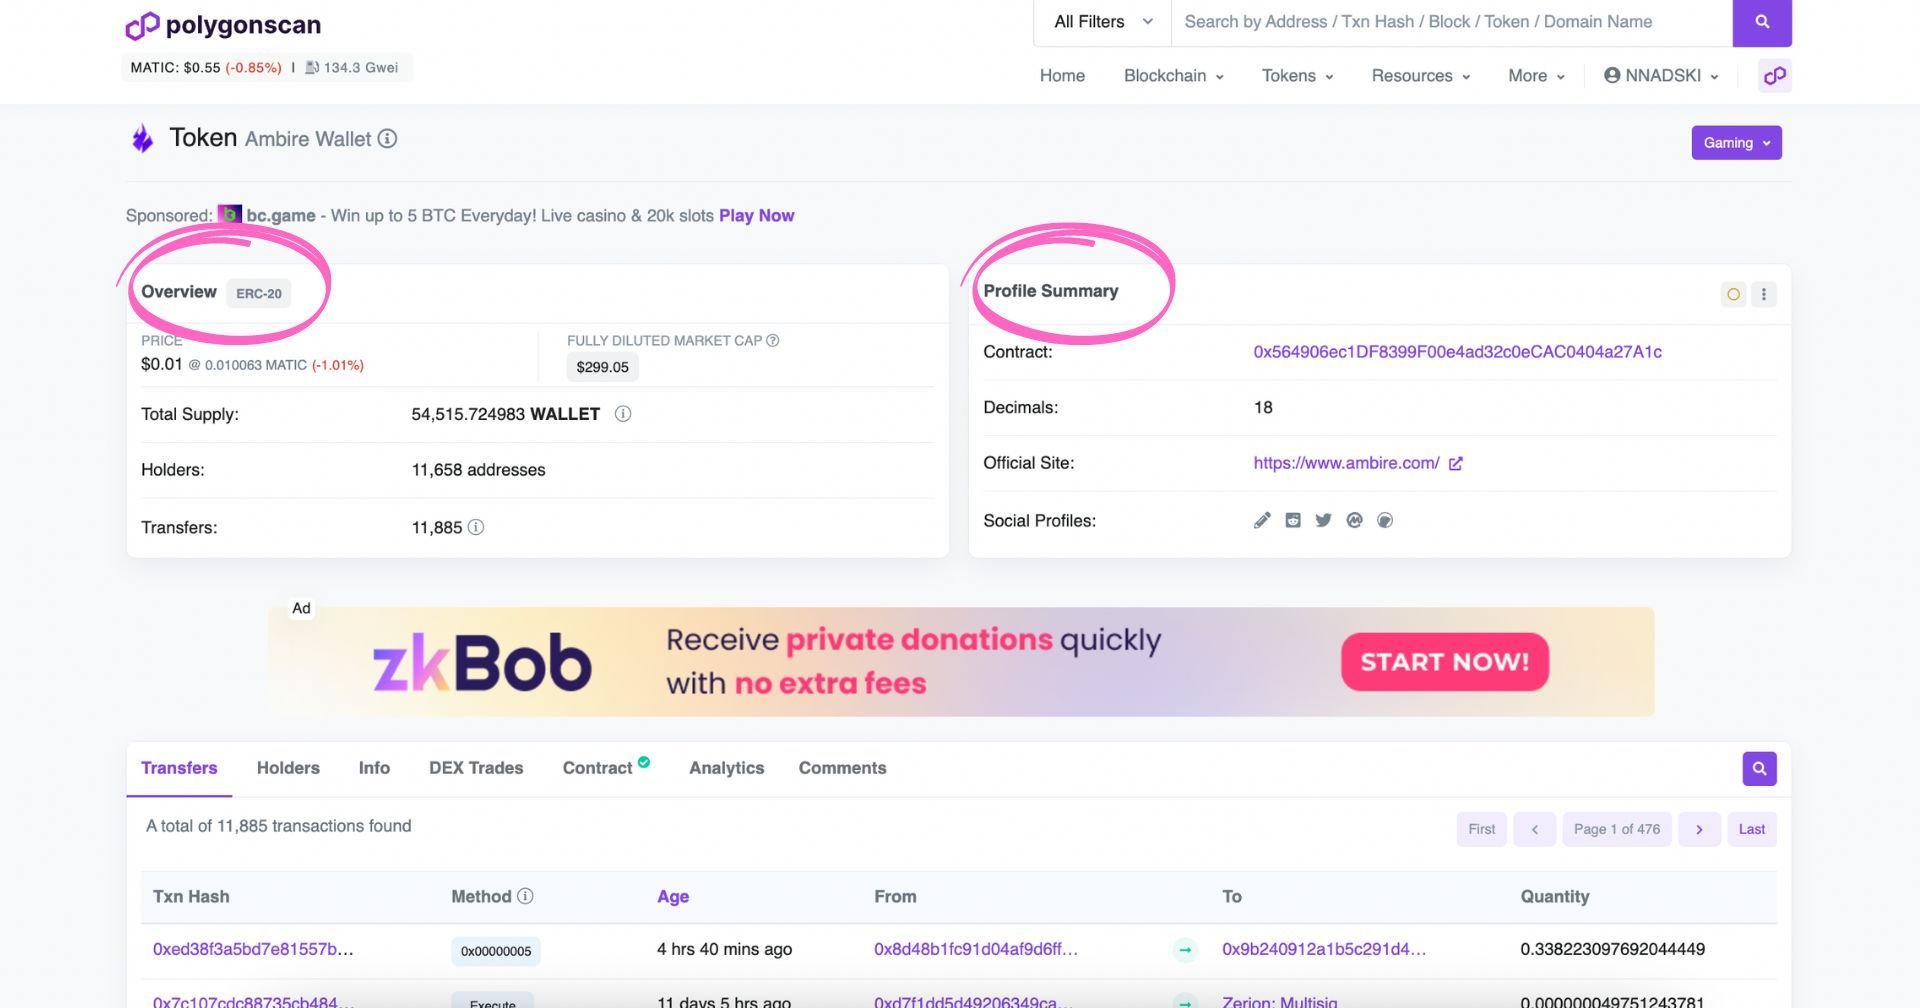
How to Find Token Decimals on Polygonscan?
- Go to Polygonscan, search for the token you are interested in in the search bar, and click the search button.
- The token decimals are displayed under the Profile Summary on your right-hand side, beneath the token's contract address.
The overview will tell you which type of token it is (in this case, ERC-20), the price of the token, the total supply, and the number of holders and transfers, while the Profile Summary will give you information about the contract address, decimals, site of the project, as well as social profiles.
You can get additional information, such as transfers, holders, DEX trades, the smart contract source code, and analytics further down the page.
Tracking NFTs on Polygonscan
Polygonscan has a dedicated page for Top ERC-721 tokens or NFTs. If you want to see the NFTs in a specific collection, you only have to click on the collection and then select view NFT on the right-hand side. There, you will see a preview of the NFT and additional data such as owner, creator, item activity, etc.
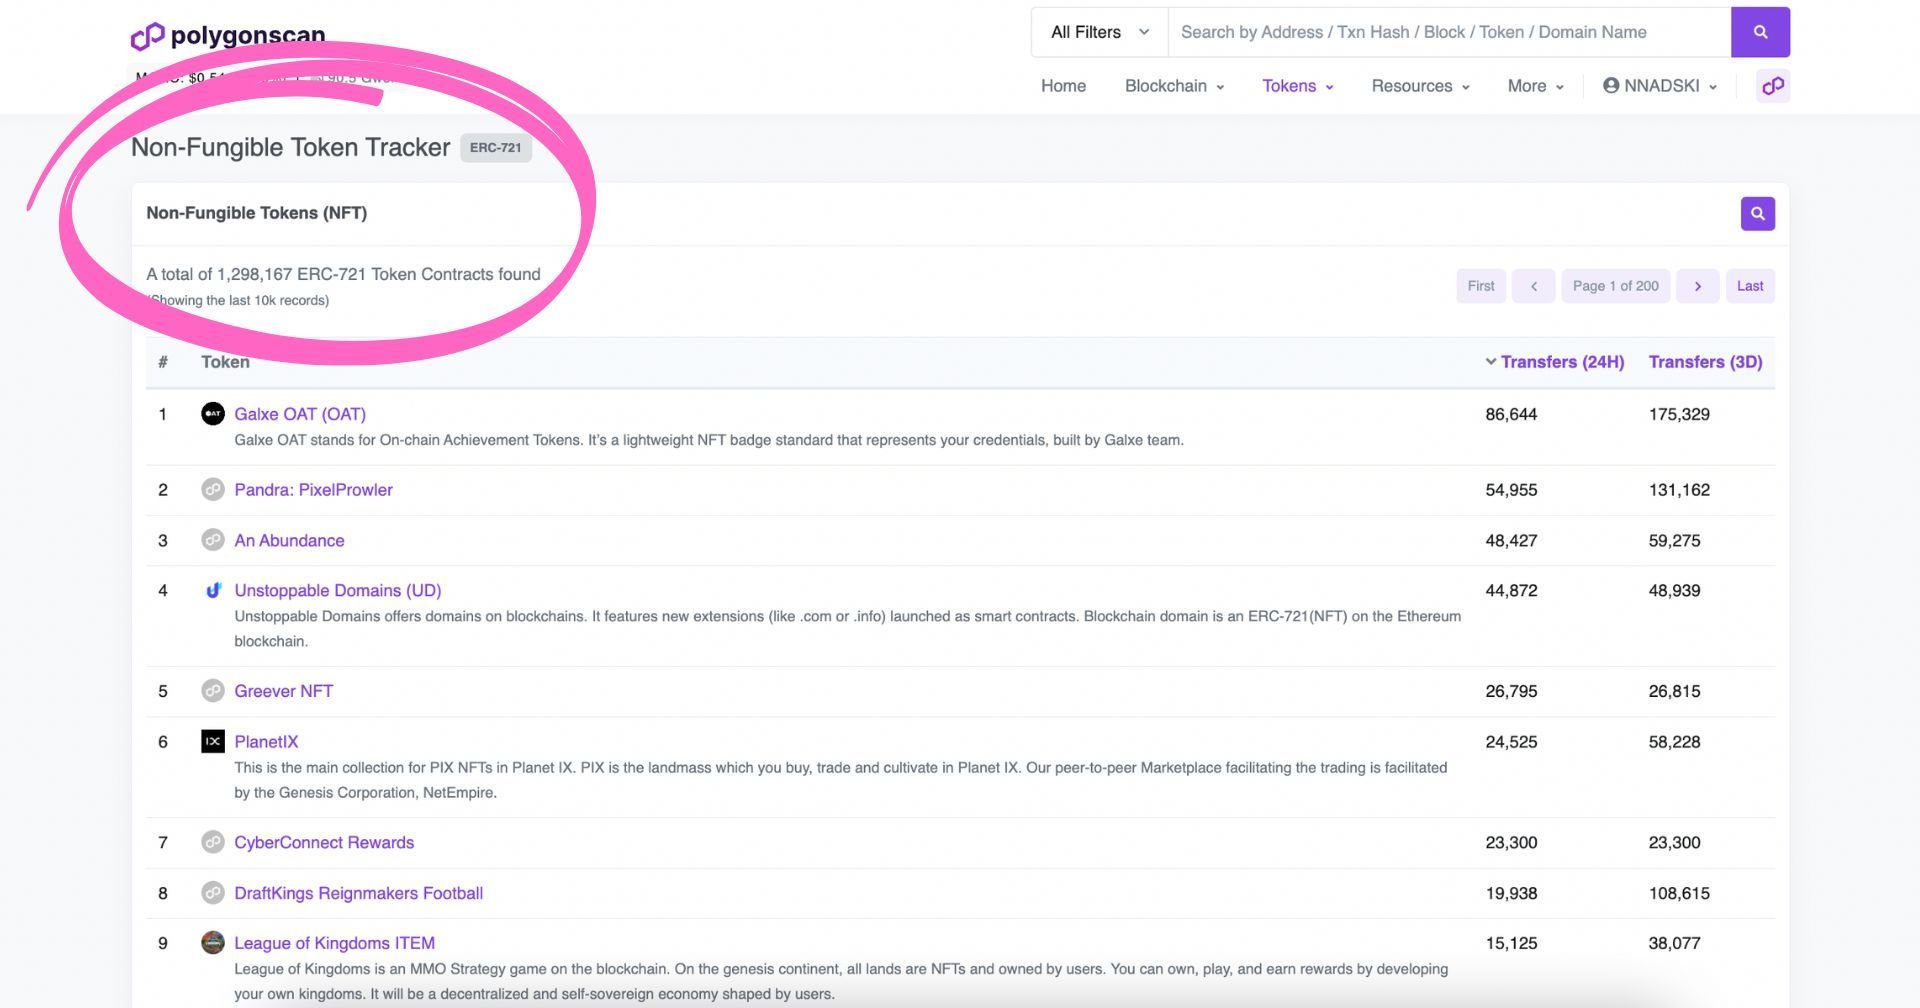
Understanding Polygonscan’s Gas Tracker
Polygonscan has a dedicated Gas Tracker page where you can see the average gas per transaction depending on the speed and Pending Transaction Pool Info (including a graph). Underneath this info, you can see the ‘Gaz Guzzlers’ - aka Top 25 Contracts / Accounts that consume a lot of Gas, and ‘Gas Spenders’ - the Top 25 Sending Accounts that pay a lot of Gas.
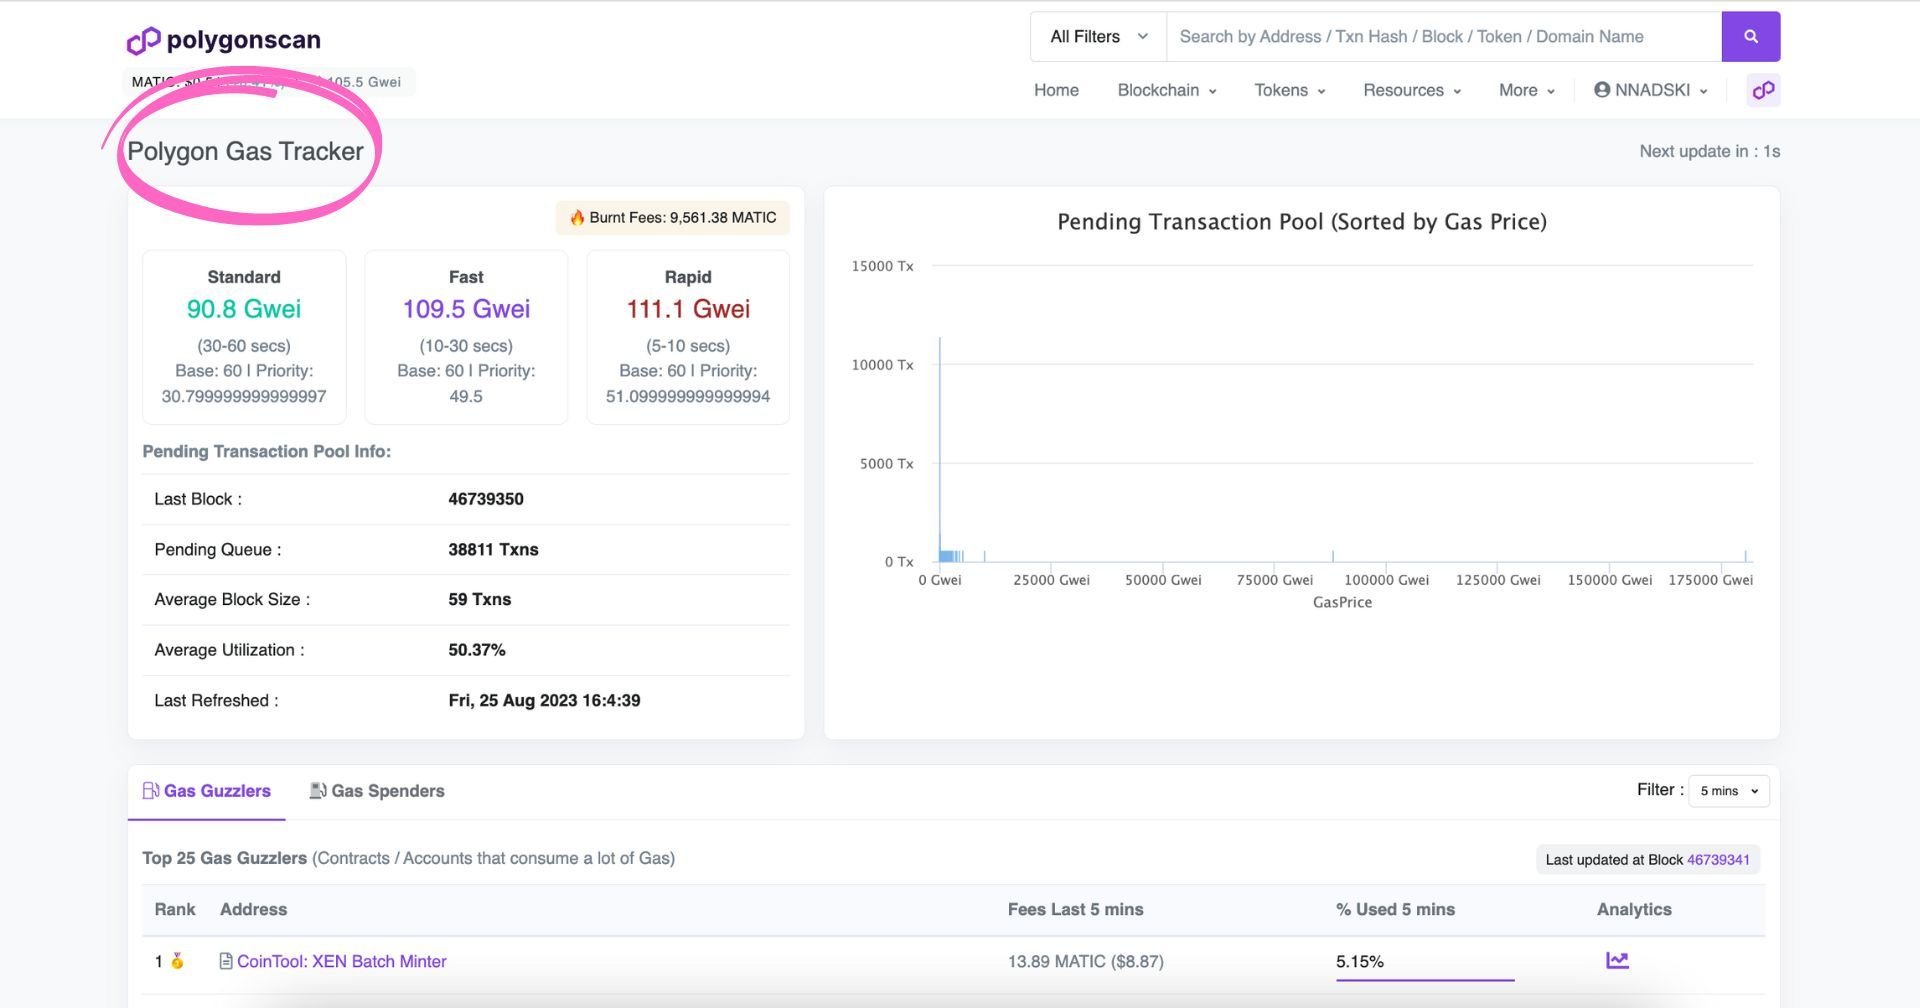
How to Read Top Stats on Polygonscan
If you’re after statistics, Polygonscan has you covered. On the Top Stats page, you can see the top statistics by Transactions (e.g., who sent the most MATIC in the last day), Network, Tokens, or Validators. You can select a time frame of 1 or 3 days or a week.
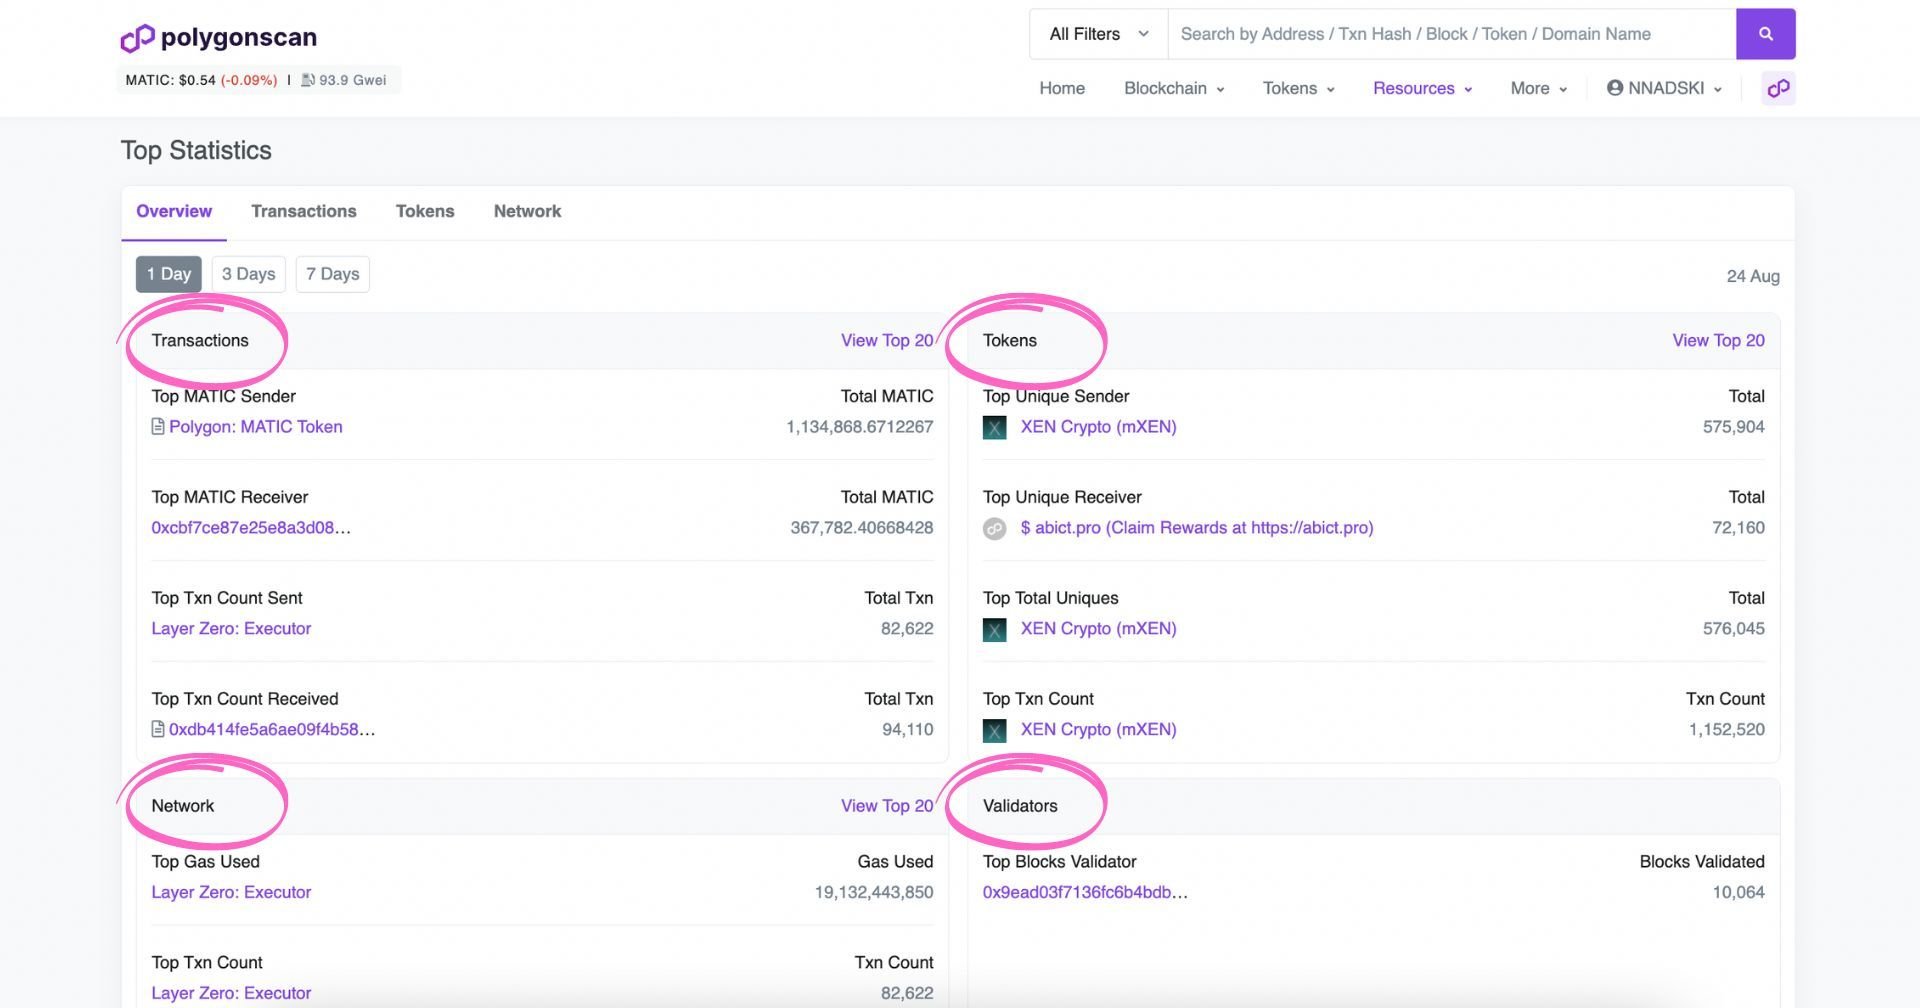
Other Useful Tools on Polygonscan
You do not require an account to use Polygonscan. However, if you register one, you can take advantage of further features. Let’s look at what they are:
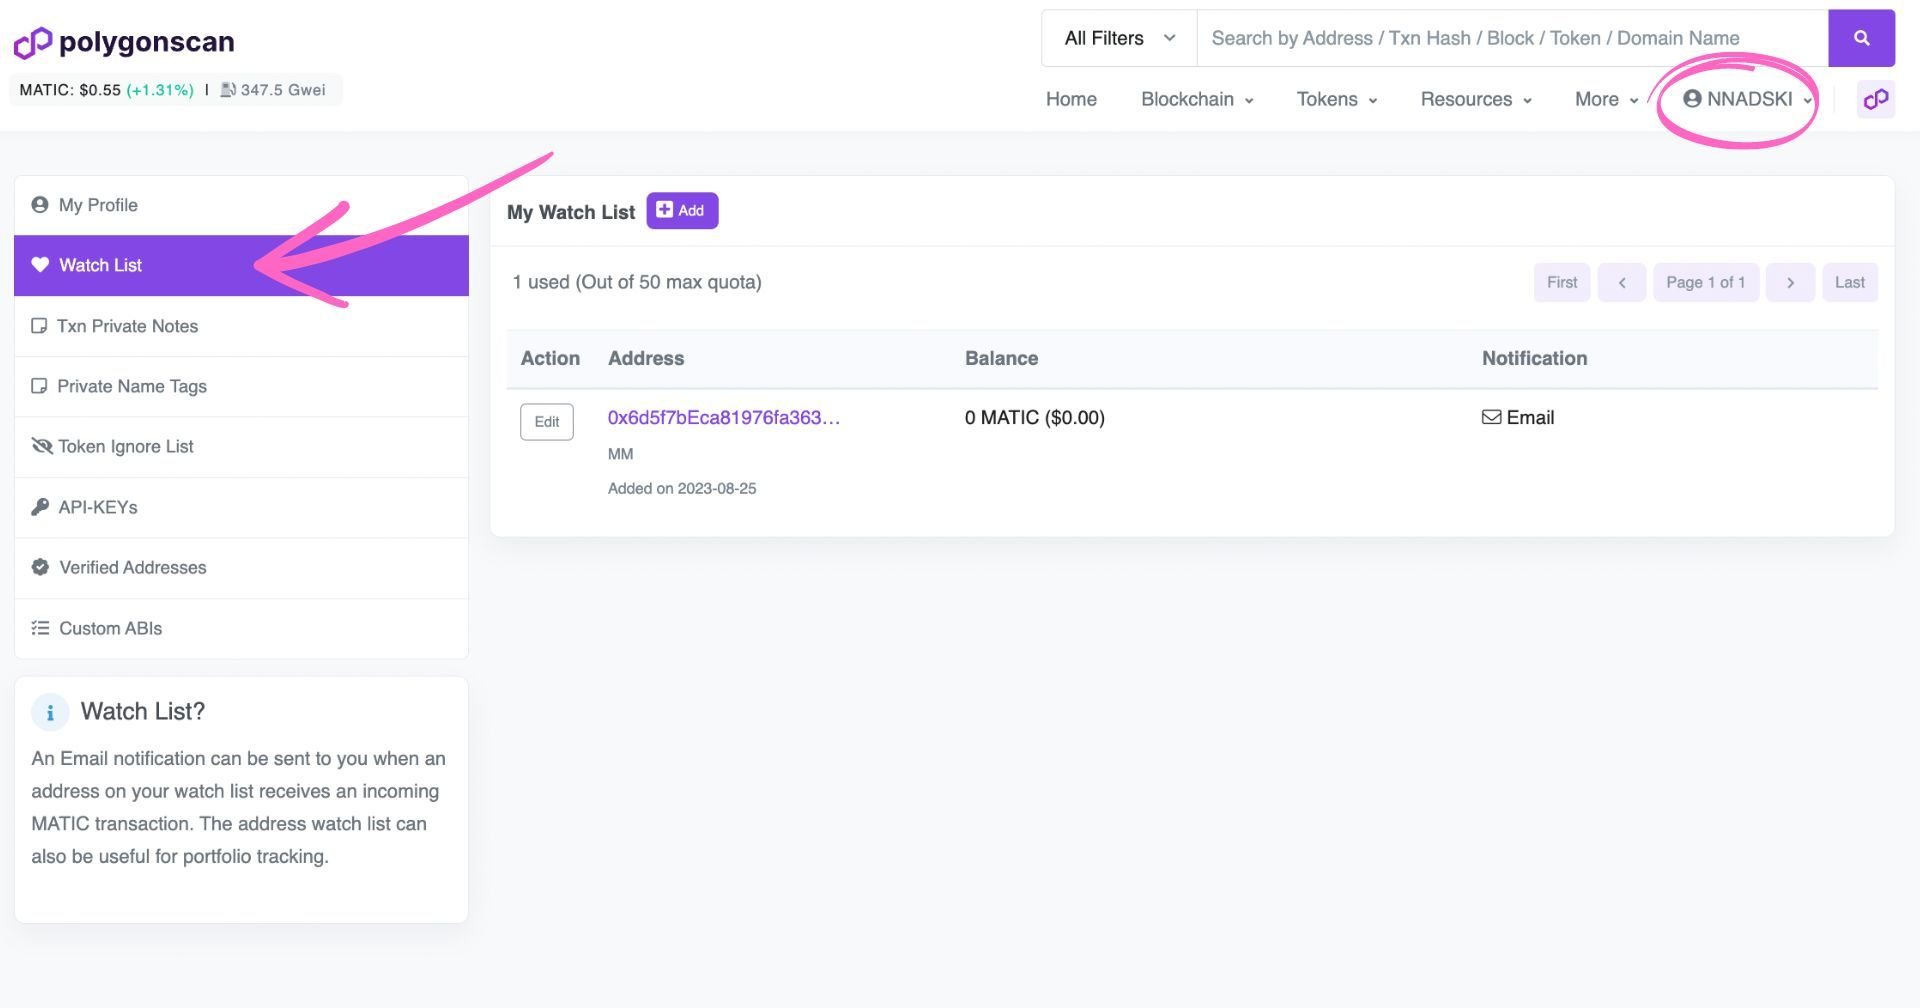
Watchlist
This option allows you to receive notifications when an address you’re interested in performs transactions. You can subscribe to incoming or outgoing transactions or both.
Transaction Private Notes
You can add notes to transactions - e.g. if it is an important transaction or one you may need to refer to later. The transactions will private notes will appear under your profile then, and you will be able to see your notes in the Transaction Overview, too.
Private Name Tags
You can give human-readable names to addresses here - or look at it like an ‘Address Book’ - this way, you can save your most used wallet addresses. Whether it’s your own wallet addresses or those of friends or colleagues, you can easily check who an address belongs to if you have set a name tag.
Token Ignore List
This feature allows a registered Polygonscan user to hide tokens from showing up in token-holding lists across the website. When a token is hidden, its price will not contribute to the address' total token value.
The Bottom Line
The information is out there - and information is power, so make sure you understand the tools you’re using. This way, you can make the most out of them and make them work for you while you sit back and relax.
We have tried to cover all the major features you need to know about. However, if you are interested in more detail, you can check out Polygonscan’s knowledge base.
*Disclaimer: Some Polygonscan features are still in Beta; users are advised to exert caution when performing blockchain operations via Polygonscan.
Related articles
How to bridge assets from Ethereum to Polygon
Interested in Ambire? Follow us:
Discord | X (Twitter) | Reddit | GitHub | Telegram | Facebook
