How to Bridge Assets from Ethereum to Polygon (Step-by-Step Guide)
Learn the essentials of bridging assets from Ethereum to Polygon and how Ambire Wallet streamlines this process, providing a convenient and cost-effective solution for engaging with Polygon's scalable platform.
Welcome to the innovative world of Polygon, a multi-chain Layer 2 scaling solution for Ethereum. Polygon stands out in the blockchain ecosystem for its ability to solve critical issues like high transaction fees and slow processing times on the Ethereum network. This guide will explore how to bridge assets from Ethereum to Polygon and how Ambire Wallet simplifies the process, making it a seamless and user-friendly experience.
Why bridge from Ethereum to Polygon?
Bridging from Ethereum to Polygon offers benefits primarily related to enhanced efficiency and cost-effectiveness. Transacting on the Polygon network significantly reduces transaction fees, making it an economical choice for users and developers. Its ability to process transactions rapidly addresses Ethereum's limitations in speed, catering to applications that demand quick response times. This efficiency is a blessing for those engaging in frequent or high-volume transactions.
Moreover, Polygon's ecosystem is rich and diverse, hosting a wide array of decentralized applications (dApps), from DeFi platforms to NFT marketplaces. You can access this expansive world by bridging to Polygon and enjoying its scalability and interoperability. Most importantly, Polygon maintains robust security, inheriting Ethereum's trusted framework, while its energy-efficient operations align with the growing preference for sustainable blockchain solutions.
Most popular Polygon bridges
The official Polygon Bridge is preferred when bridging assets from Ethereum to Polygon. Still, several third-party bridges offer unique features to cater to diverse user needs. These bridges connect Ethereum's robust network seamlessly with Polygon's efficient ecosystem.
- Official Polygon Bridge: The go-to choice for many, the official Polygon Bridge offers a direct and secure way to transfer assets between Ethereum and Polygon. It's known for its reliability and integration with the Polygon network, providing a straightforward bridging experience.
- Across Protocol: This bridge is celebrated for its security and capital efficiency. Backed by UMA's optimistic oracle, it ensures secure transactions and supports a broad range of tokens. Its compatibility with popular wallets like MetaMask makes it a versatile option.
- Synapse: Favored for its low fees and user-friendly interface, Synapse appeals to those prioritizing cost-effectiveness and ease of use. It offers low slippage rates and fast transaction times, making it an efficient choice for quick asset transfers.
Hop Protocol: Ideal for speed-focused users, Hop Protocol enables rapid and secure transfers across various layer-2 solutions, including Polygon. It reduces wait times and costs, providing a smooth bridging experience.
Each bridge has its advantages regarding fees, speed, security, and supported tokens. When selecting a bridge, consider these factors and ensure it's compatible with your wallet and the specific assets you intend to transfer.
What do you need to bridge from Ethereum to Polygon?
Bridging assets from Ethereum to Polygon is a straightforward process, but it requires a few essentials. First, you'll need a Web3 wallet, such as MetaMask or Ambire Wallet, which acts as your gateway to interact with blockchain networks. Additionally, having ETH in your wallet is needed to cover the gas fees on the Ethereum side of the transaction. Once your assets reach Polygon, MATIC, the native token of the Polygon network, is required to facilitate transactions or any further operations on this chain.
Ambire Wallet streamlines this bridging process significantly. Firstly, it allows users to pay gas fees in almost any token, not just ETH, adding a layer of convenience. Moreover, its built-in bridge and swap functionality simplify the process, enabling users to execute all necessary actions within a single platform. Ambire Wallet also features advanced transaction simulation and batching, which optimizes the process for efficiency and cost-effectiveness and enhances the overall user experience.
Bridging assets from Ethereum to Polygon with MetaMask
The official bridge within the Polygon Portal facilitates the transfer of assets between Ethereum and Polygon, supporting both the Polygon PoS (Proof of Stake) chain and the newer Polygon ZkEVM (Zero-Knowledge Ethereum Virtual Machine). While this guide focuses on using the PoS bridge with MetaMask, it's worth noting that the process for bridging assets to the Polygon ZkEVM is similar, offering users an alternative with enhanced privacy and scalability features.
A step-by-step guide to bridging using the Polygon PoS bridge and MetaMask
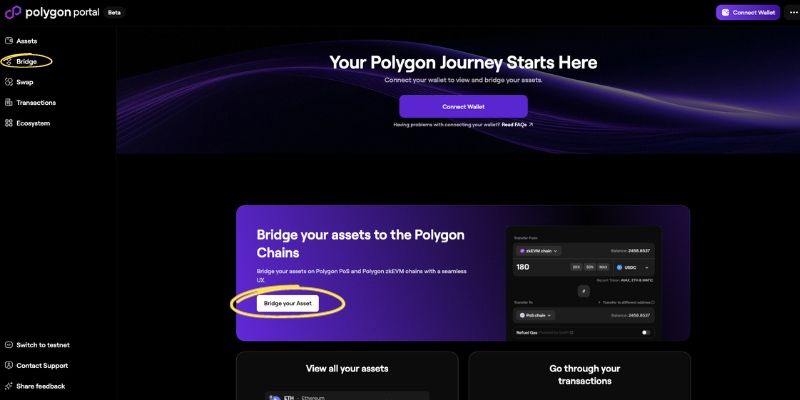
1. Access the official Polygon Bridge: Open your web browser and navigate to the official Polygon Portal. Select ‘Bridge’ in the left navigation or click the ‘Bridge Your Assets’ button.
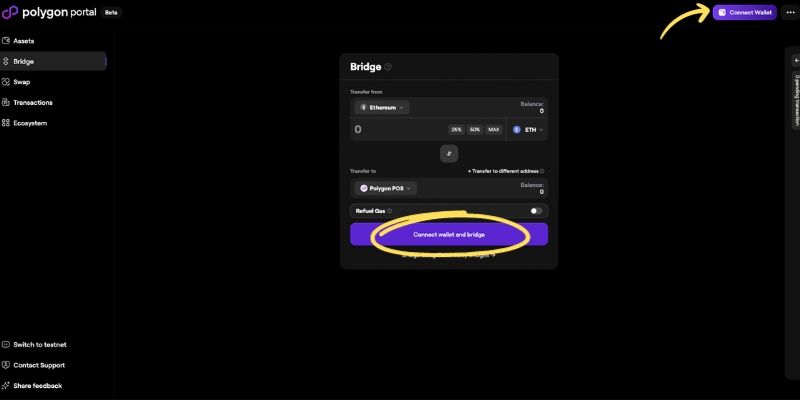
2. Connect MetaMask wallet: Select the option to connect your wallet in the upper right corner, or click ‘Connect wallet and bridge’ in the bridge window and choose MetaMask. Follow the prompts in Metamask to establish a secure connection.
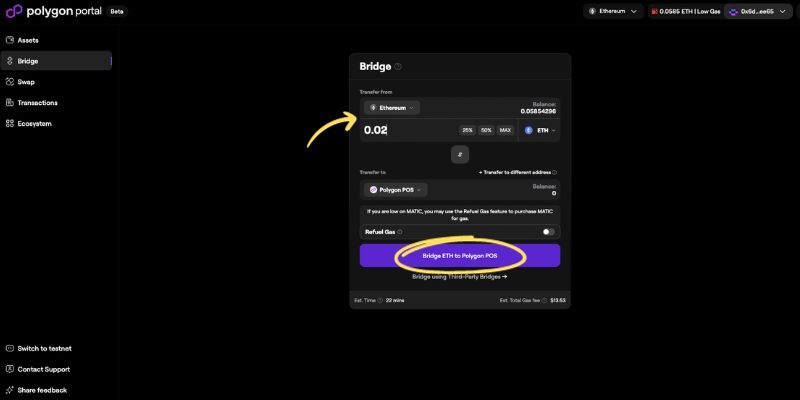
3. Select token and amount: Choose the asset (e.g., ETH or an ERC-20 token) you wish to transfer from Ethereum to Polygon. Enter the amount you want to bridge. Optionally, you can also ‘Refuel’ - or purchase MATIC for gas on Polygon within the same transaction.
4. Initiate the transfer: Confirm the transaction details, including the destination chain (Polygon PoS) and the gas fees. Initiate the transfer by clicking on ‘Bridge [token] to Polygon POS’ and sign the transaction in your MetaMask wallet.
The bridging process will begin. This can take some time, depending on the current network congestion - an estimate will be shown to you before you confirm the transfer. You can track the transaction status using Etherscan.
Limitations and considerations
When bridging from Polygon to Ethereum, be aware of potential waiting periods. These are necessary for security reasons and can vary in duration. Sometimes, liquidity constraints affect the availability or speed of the bridging process. Checking for any such issues is advisable, especially for large transactions.
Bridging back from Polygon to Ethereum
The reverse process of bridging assets from Polygon back to Ethereum involves similar steps but with a few notable differences.
- Access the bridge: Go to the official Polygon Bridge and connect your MetaMask wallet set to the Polygon network.
- Initiate the withdrawal: Select the asset you want to transfer back to Ethereum and enter the amount. Confirm the transaction details.
- Confirm and wait: After confirming the transaction in MetaMask, there will be a waiting period of up to 7 days when using the PoS bridge or up to 3 hours when using the Plasma Bridge for security checks before the assets are released on the Ethereum network.
- Completion: Once the waiting period ends, you must claim your assets on the Ethereum network. This final step will require a transaction confirmation in MetaMask.
Bridging assets from Ethereum to Polygon with Ambire Wallet
Ambire Wallet significantly simplifies the asset bridging process from Ethereum to Polygon by integrating all necessary functionalities within its platform. This all-in-one solution offers a user-friendly interface, making the cross-chain transfers seamless and efficient. Here are the steps you need to follow:
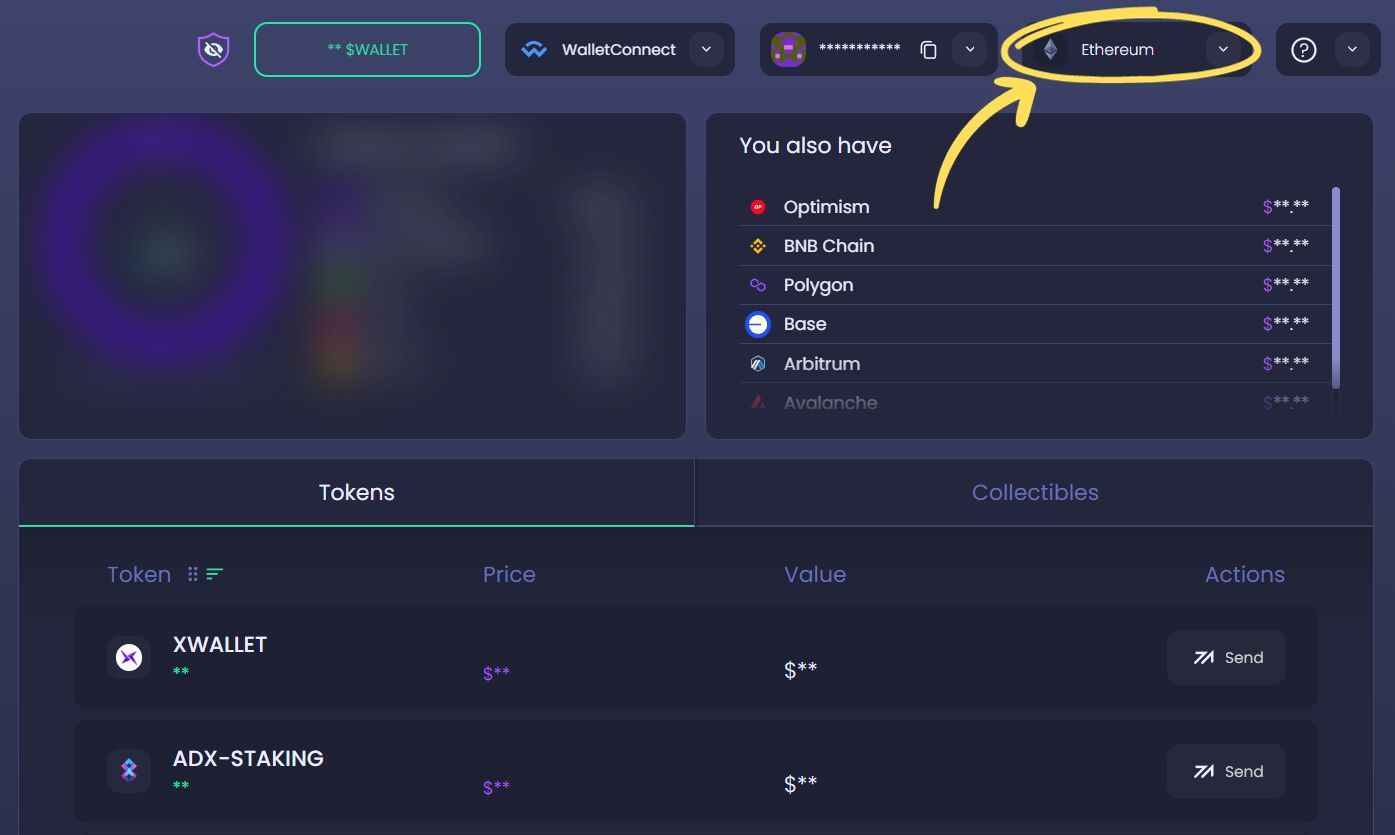
First, open Ambire Wallet and select the Ethereum network
- Launch your Ambire Wallet.
- Once in the wallet, ensure that you are on the Ethereum network. This can be done by checking the network selection dropdown at the top or side of the interface.
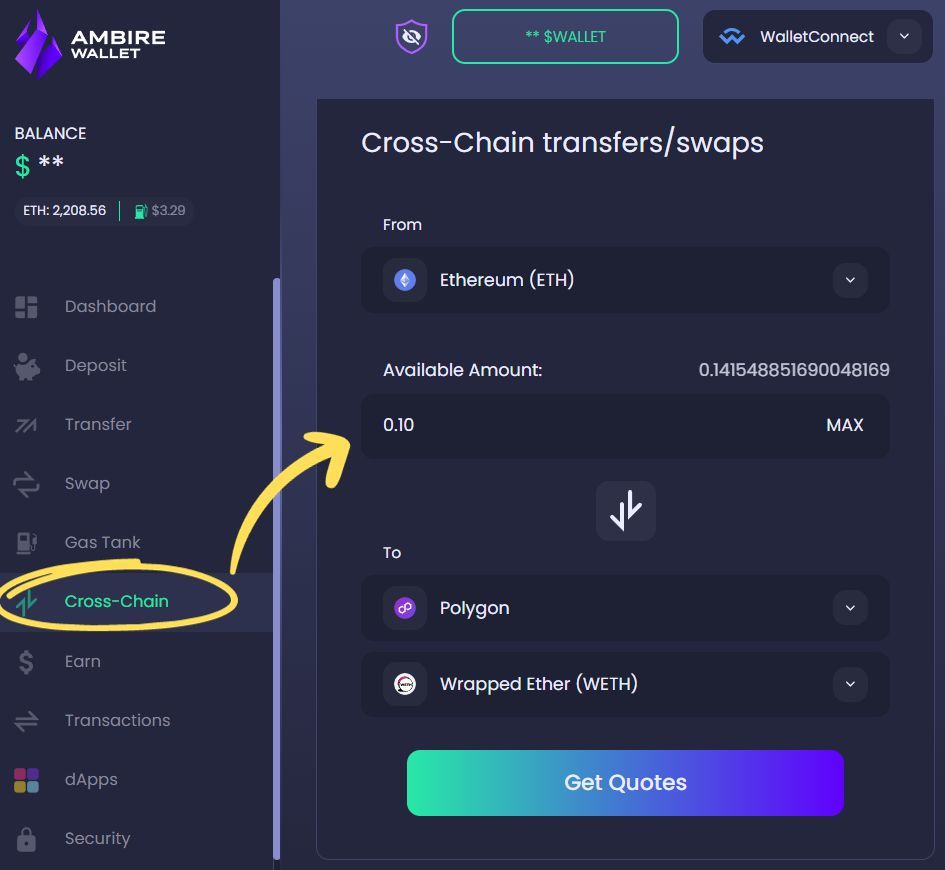
Then navigate to the Cross-Chain tab and prepare the transaction
- Locate and click on the 'Cross-Chain' tab within Ambire Wallet. This section is dedicated to managing assets across different blockchains.
- Select the asset you wish to bridge from Ethereum to Polygon. Enter the amount you want to transfer.
- After clicking on ‘Get Quotes,’ the wallet will automatically display the best bridging routes and associated fees for your transaction.
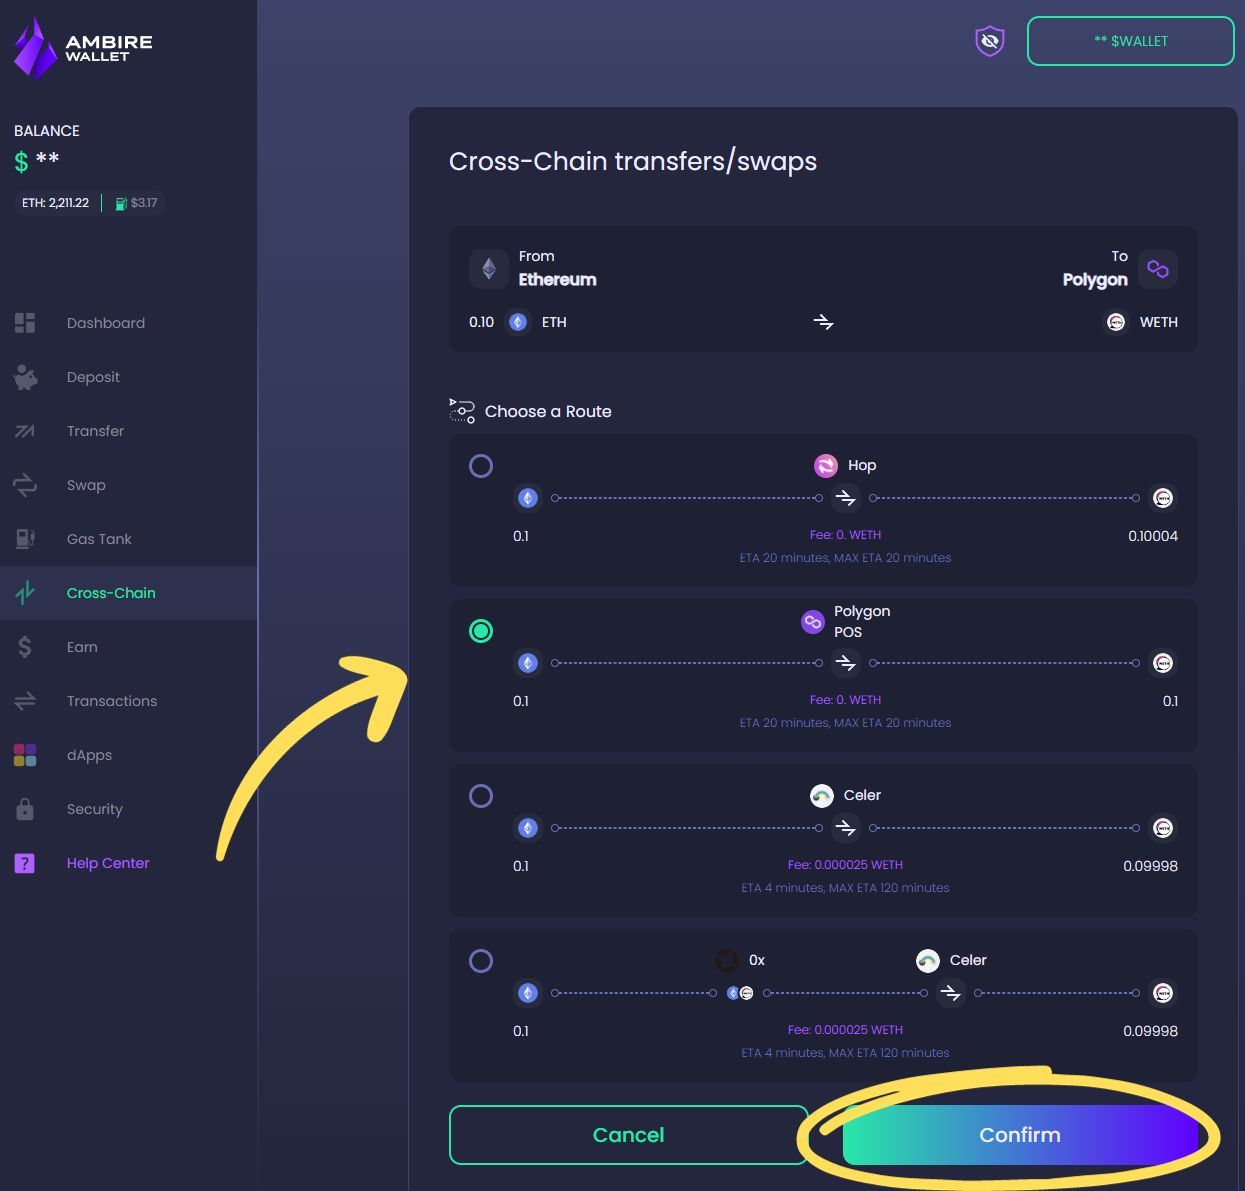
Finally, confirm the bridging transaction
- Review the transaction details, including the selected bridging route and fees. Ensure that everything is in order before proceeding.
- Sign the transaction. Ambire Wallet will prompt you to sign the transaction, authorizing the bridge.
- Once confirmed, the bridging process will begin. Switch the network to Polygon from the dropdown to view your bridged tokens. Remember that the transaction may take some time to execute, so be passionate.
Following these simple steps, users can efficiently bridge assets from Ethereum to Polygon without leaving the wallet and navigate complex interfaces.
Summary
Bridging assets to Polygon offers many benefits, including access to faster transaction speeds and significantly lower fees than the Ethereum mainnet. This transition enhances the efficiency of transactions and opens up a world of opportunities in Polygon's diverse ecosystem, which includes a wide range of dApps and services.
Layer 2 solutions like Polygon are at the forefront of the evolving blockchain landscape. They address critical scalability and cost issues associated with Layer 1 networks like Ethereum without compromising security. As the blockchain space continues to grow and evolve, Layer 2 platforms are expected to play a pivotal role in driving mainstream adoption and utility of Web3. The future outlook for solutions like Polygon is promising, with ongoing developments to enhance interoperability, user experience, and overall network efficiency.
FAQ
What is the cheapest way to transfer ETH to Polygon?
The cheapest way to transfer ETH to Polygon can vary based on network conditions and the bridge used. It's advisable to compare the gas fees and additional charges of different bridges at the time of transfer. Some popular bridges, like the official Polygon Bridge or Hop Protocol, might offer competitive rates.
What is the best bridge for Polygon to Ethereum?
The best bridge from Polygon to Ethereum depends on individual needs such as speed, security, and cost. The official Polygon Bridge is widely used for its reliability. However, bridges like Synapse or Across Protocol are also popular for their efficiency and user-friendly interfaces.
How long does bridging ETH to Polygon take?
The time to bridge ETH from Ethereum to Polygon typically ranges from a few minutes to several hours, depending on the network congestion and the specific bridge used. The official Polygon Bridge usually completes transactions relatively quickly, but checking current network conditions is always good.
Why bridge to Polygon?
Bridging to Polygon is beneficial for accessing lower transaction fees, faster processing times, and a diverse range of decentralized applications (dApps) available on the Polygon network. It's also a way to leverage Polygon's scalability and efficiency while maintaining the Ethereum network's security.
What assets can be bridged from Ethereum to Polygon?
A wide range of assets can be bridged from Ethereum to Polygon, primarily including ERC-20 tokens like ETH, USDT, USDC, and many others. The specific assets supported can vary between different bridges, so it's essential to check the compatibility of your assets with the chosen bridge.
Why is Polygon cheaper than Ethereum?
Polygon is cheaper than Ethereum because it operates as a Layer 2 scaling solution, which processes transactions off the main Ethereum chain. This results in lower transaction fees and faster processing times, as Polygon can handle transactions more efficiently than the congested Ethereum mainnet.
What happens when you bridge Ethereum to Polygon?
When you bridge Ethereum to Polygon, your assets are locked on the Ethereum network, and a corresponding amount of the same asset is minted on the Polygon network. This process ensures that the total supply of the asset remains constant across both networks.
Does ETH on Polygon have gas fees?
Yes, transactions on Polygon, including those involving ETH, incur gas fees. However, these fees are typically much lower than on the Ethereum mainnet due to Polygon's efficient processing and scalability solutions.
Interested in Ambire? Follow us:
Discord | X (Twitter) | Reddit | GitHub | Telegram | Facebook