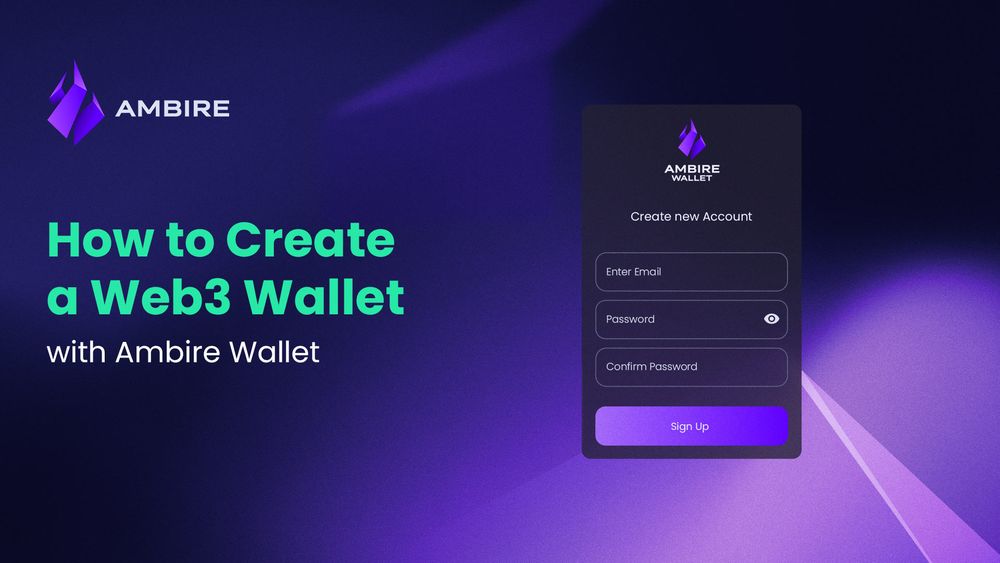
How to Create a Web3 Wallet with Ambire Wallet
Creating a Web3 wallet is your first step into the decentralized internet. This Ambire Wallet guide helps you set up and secure your wallet, giving you full control over your digital assets.

Welcome to the world of Web3, where the power of the internet is decentralized and in the hands of its users. If you're transitioning from traditional financial systems or looking for more control over your digital assets, creating a crypto or Web3 wallet is your first step into this new arena. Ambire Wallet offers a user-friendly yet powerful and secure platform for both novices and seasoned crypto enthusiasts to manage their digital currencies securely. Let's walk you through creating your own Web3 wallet with Ambire Wallet.
What is a crypto wallet?
A crypto wallet is your gateway to blockchain networks where you can manage cryptocurrencies, engage with decentralized applications (dApps), and interact with smart contracts. There are a few types of crypto wallets. For example, some are custodial (e.g., an account at a centralized exchange), and others are self-custodial. We always recommend self-custodial Web3 wallets because, unlike traditional custodial ones, a Web3 wallet gives you full control over your digital assets without intermediaries. This means you hold the keys to your financial sovereignty. Furthermore, some are Externally Owned Accounts (EOAs), which have some limitations, and there are Smart Contract Wallets like Ambire with a whole bunch of previously unavailable features.
A step-by-step guide to creating your Ambire Wallet
Creating a Web3 Ambire Wallet is as easy as opening an account on any centralized crypto exchange - if not easier, because there is no KYC required. There are multiple ways to create an account - e.g., using email and password, using another crypto wallet, or even with a hardware wallet. The following tutorial will walk you through creating a wallet using your email account and a password.
Step 1: Sign up for an account with email and password
On the web:
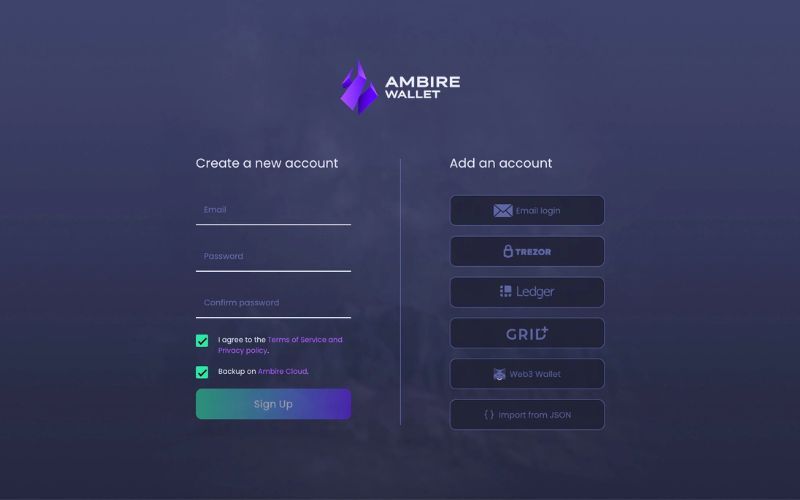
- Navigate to the Ambire web wallet page.
- Enter a valid email address, select a strong password, and re-enter it for confirmation.
- It's imperative to agree to the terms of service by checking the box.
- We strongly recommend enabling the Ambire Cloud backup by checking the second box. This feature encrypts and stores a copy of your wallet's encrypted private key, ensuring you can always recover your wallet.
- Click on 'Sign up.'
- You will get a verification email in your inbox. Open it, and click on the ‘Confirm’ link.
- You are ready to use your wallet.
On mobile:
If you are on a mobile device and prefer the app, here is what you need to do:
- Download the Ambire Wallet app from Google Play if your device runs Android or the App Store if you are on an iPhone.
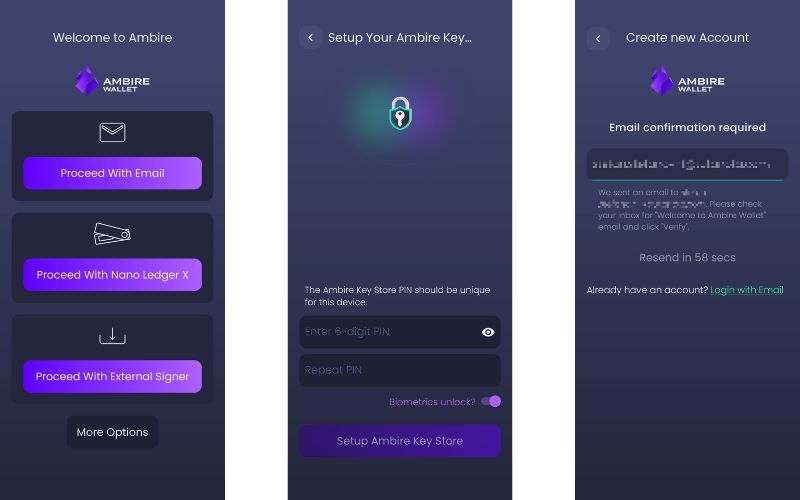
- Open the app and click on 'Proceed to Wallet.'
- On the second screen, click on 'Get started'.
- Set up your Ambire keystore pin (Android) or password (iOS): this is a password just for the specific device - and it is separate from the account password. Confirm it by entering it again. If you wish to unlock your wallet with biometrics, tick the slider. Confirm your identity by biometrics, and click Setup Ambire Key Store.
- Select ‘Proceed With Email’ on the next screen.
- Click on ‘Sign Up’ and enter a valid email you can access, as well as a secure password, and tap on the ‘Sign Up’ button.
- You will get a verification email in your inbox. Click the link to confirm your email address.
- You are now ready to use the wallet.
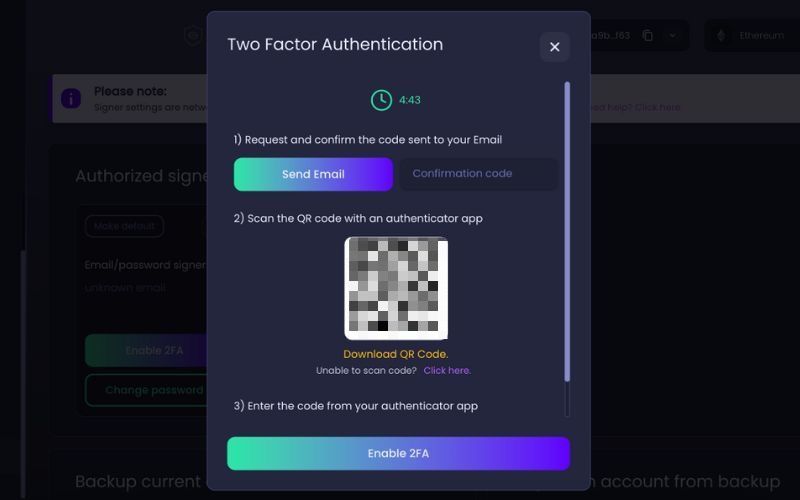
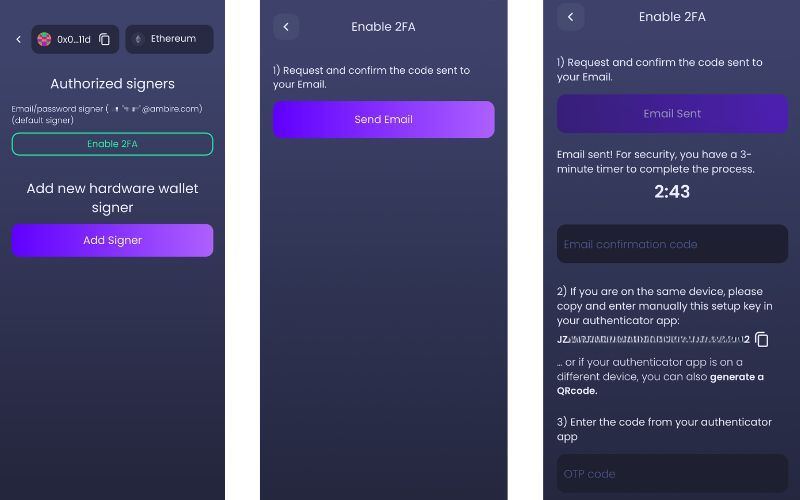
Step 2: Secure your account with 2FA or a hardware wallet (optional)
We highly recommend you enhance your wallet's security by setting up two-factor authentication (2FA) in the security settings. You can add another Web3 wallet or a hardware wallet as a signer key for those seeking even greater security. The web version supports various devices, including Trezor, Ledger, and Grid. Mobile users can pair their accounts with a Ledger Nano X via Bluetooth.
On the web:
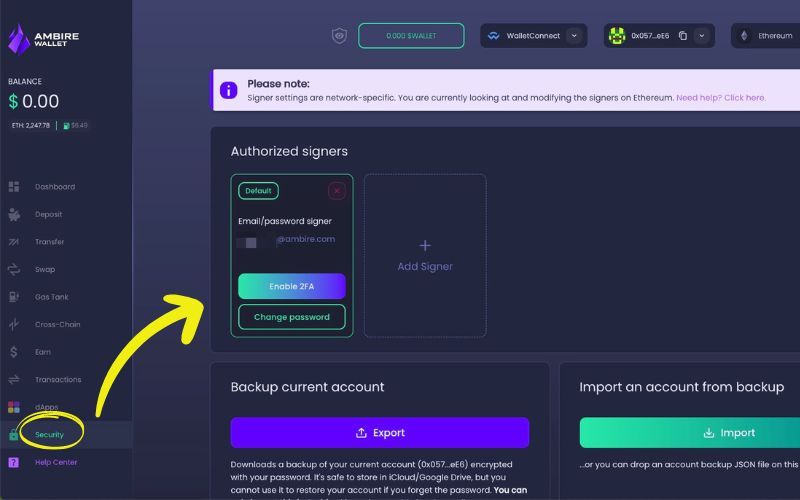
- Go to the Security tab on the left-hand side of your screen.
- Under Authorized signers, click on ‘Enable 2FA’.
- In the pop-up, you must request a confirmation code to your account email and then enter the confirmation code. Scan the QR code with an authentication app like Google Authenticator, and after that, enter the code in the second input field. Click on ‘Button name.’ You have successfully enabled 2FA.
On mobile:
- Open the menu by tapping the burger menu in the upper left corner.
- Select ‘Signers’ from the menu.
- On the open page ‘Authorised signers,’ select ‘Enable 2FA’.
- Click on 'Send Email’ to be sent a code to receive a 2FA code to be sent to your email and to set up a key in an authenticator app.
- Enter the email confirmation code from your email and the OTP code from the authenticator app, then tap on ‘Enable 2FA’ - and you’re all set.
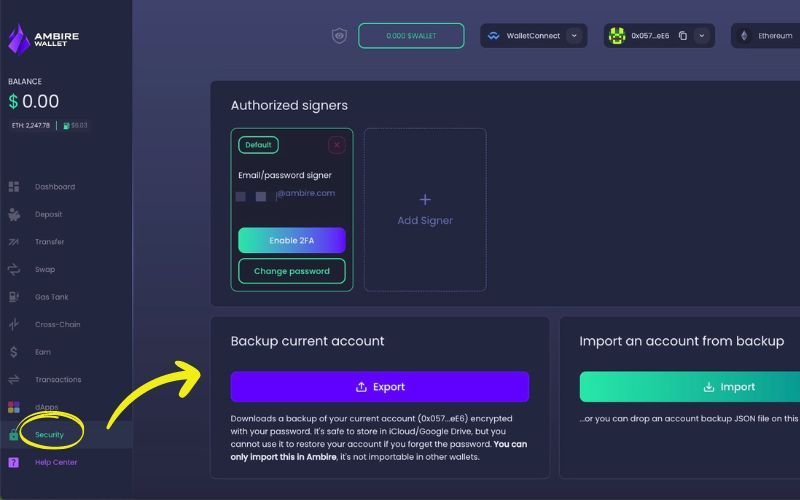
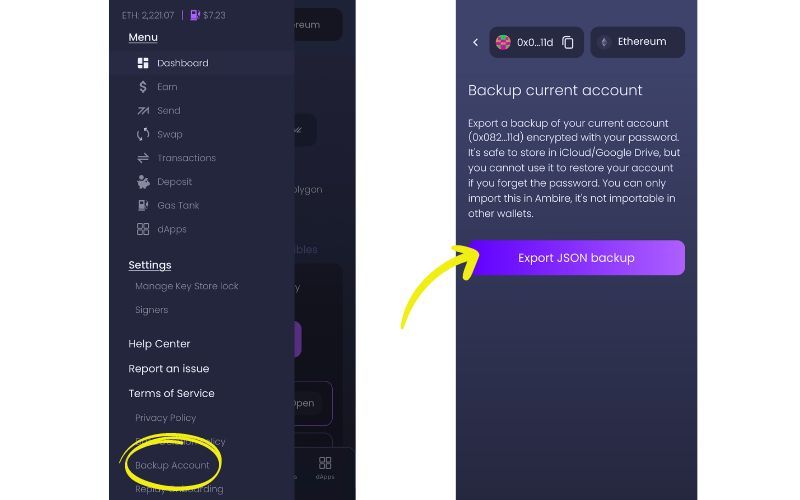
Step 3: Backup your wallet
In the wallet settings, locate the backup section and download your wallet's JSON file. Keep this file in a secure location—it's an indispensable tool for wallet recovery, allowing you to regain access to your wallet on any device.
On the web:
- Go to Ambire Wallet
- Click on the Security tab from the sidebar menu
- Navigate to the ‘Backup current account’ section, and click the ‘Export’ button.
- A file download initiates; save the file on your device.
- Make sure to backup your JSON file in a safe place.
On mobile:
- On the Ambire Wallet app.
- Navigate to the Backup Account on the menu.
- Once on the tab, press the ‘Export JSON backup.’
- Share/download the JSON file and store it in a safe place.
Making the most of your Ambire Web3 wallet
After setting up and securing your Ambire Wallet, you're ready to dive into the world of Web3 with confidence and ease. Here are some neat features you can explore:
Account and network management
Ambire Wallet supports 10+ EVM chains, offering a single address across all networks. This makes managing different accounts and networks a hassle-free experience. Whether using the web wallet or the mobile app, you can easily switch between accounts and chains from dropdown menus. There is a built-in cross bridge, too!
Meta transactions
One of the unique features of Ambire Wallet is the Gas Tank, which allows you to prepay for transaction fees with various cryptocurrencies, including stablecoins and native tokens. This saves you over 20% on gas fees and provides a cashback mechanism for any difference between the estimated fee at the time of transaction creation and the actual fee when the transaction is mined.
The wallet allows you to batch multiple transactions into one and sign them simultaneously. This feature streamlines the process of complex operations, such as token swaps on protocols like Uniswap, by combining approval and swap transactions into a single action. Keep your funds safe with the transaction simulation feature, which allows you to view transactions in a human-readable way before you sign them.
Explore the dApp Catalog
Ambire Wallet's dApp Catalog is a curated collection of popular decentralized applications you can access directly from your wallet's dashboard. This feature is available on the web version of Ambire Wallet and is designed to provide a secure and seamless user experience. With the dApp Catalog, you can connect to various services, from exchanges and vaults to DEX aggregators, without ever leaving the safety of your wallet.
Mobile app advantages
For users on the go, the Ambire Mobile App brings the power of Account abstraction into your pocket. Compatible with iOS and Android, the mobile app fully integrates with your existing web account, allowing for a fluid transition between devices. The mobile app includes an in-built dApp browser, making it easy to use your favorite dApps directly within the wallet.
Conclusion
With your Ambire Wallet now set up and secured, you're ready to navigate the dynamic landscape of Web3. Keep your assets secure, stay informed about the latest trends and updates, and don't hesitate to explore your wallet's functionalities. As the blockchain ecosystem evolves, so will the opportunities within Ambire Wallet, providing new avenues to grow your digital asset portfolio and understanding of this revolutionary space.
FAQs
Do I need a Web3 Wallet?
A Web3 wallet is essential to interact with the decentralized web. It's not just a storage space for cryptocurrencies; it's your access key to decentralized applications (dApps), finance, and governance in the blockchain world.
Is creating a Web3 wallet free?
Creating a wallet with Ambire Wallet is free of charge. However, when you transact on the blockchain, you may incur network fees, which are part of the blockchain's infrastructure and not specific to Ambire Wallet.
Is a Web3 wallet safe?
A Web3 wallet like Ambire Wallet can be very safe when used correctly. It's important to follow security best practices such as enabling two-factor authentication (2FA), using a hardware wallet for additional protection, and never sharing your account credentials.
What is the best Web3 wallet to use?
The best Web3 wallet offers a balance of ease of use, security, and functionality. Ambire Wallet, for instance, provides a user-friendly interface, robust security measures, and a suite of features catering to beginners and experienced users.
Is MetaMask a Web3 wallet?
Yes, MetaMask is a type of Web3 wallet that allows users to interact with the Ethereum blockchain and its ecosystem. It's one of the many options available, alongside Ambire Wallet, which supports multiple blockchains and many other superior features.
How to use Web3 without MetaMask?
Several alternatives to MetaMask include browser extensions, mobile wallets, and hardware wallets. Ambire Wallet, for example, offers a comprehensive solution with its web and mobile application, providing a seamless experience across devices.
Can you have two wallets for crypto?
Yes, it's common to use multiple wallets for different purposes. For example, one for daily transactions and another for long-term storage. This can also add an extra layer of security to your digital assets.
What is a Web3 wallet address?
A Web3 wallet address is similar to an email address but for your digital currency. It's a unique identifier that others use to send you cryptocurrencies and that you use to send cryptocurrencies to others.
Why do I need a Web3 wallet?
A Web3 wallet is your portal to the decentralized internet, where you can manage your digital assets, interact with dApps, participate in DeFi, and much more, all with autonomy and privacy.
How does a Web3 wallet work?
A Web3 wallet operates using cryptographic keys that ensure security and prove the ownership of your digital assets. It allows you to sign transactions and interact with various blockchain networks, acting as your digital identity in the Web3 space.
Interested in Ambire? Follow us:
Discord | X (Twitter) | Reddit | GitHub | Telegram | Facebook