How to Use Arbiscan
In our latest guide, learn how to navigate Arbiscan - the block explorer for Arbitrum. We cover all topics, from reading transactions to verifying smart contracts and more.
We recently published guides on using Etherscan, as well as Polygonscan. Well, now it is turn for Arbiscan. Learn how to take advantage of all the information available on it if you are using Arbitrum.
What Is Arbiscan?
Arbiscan is the leading blockchain explorer, search, API, and analytics platform for Arbitrum, a Layer 2 scaling solution for the Ethereum network. Not only does it contain read-only data for regular users, but it also allows power users to sign raw transactions or developers to access data via APIs directly.
What Can You Do with Arbiscan?
Here are Arbiscan’s main use cases:
- Read and analyze transactions
- Read and analyze blocks
- Verify smart contracts
- Sign raw transactions
- Extract data via APIs
- View tokens
- View statistics
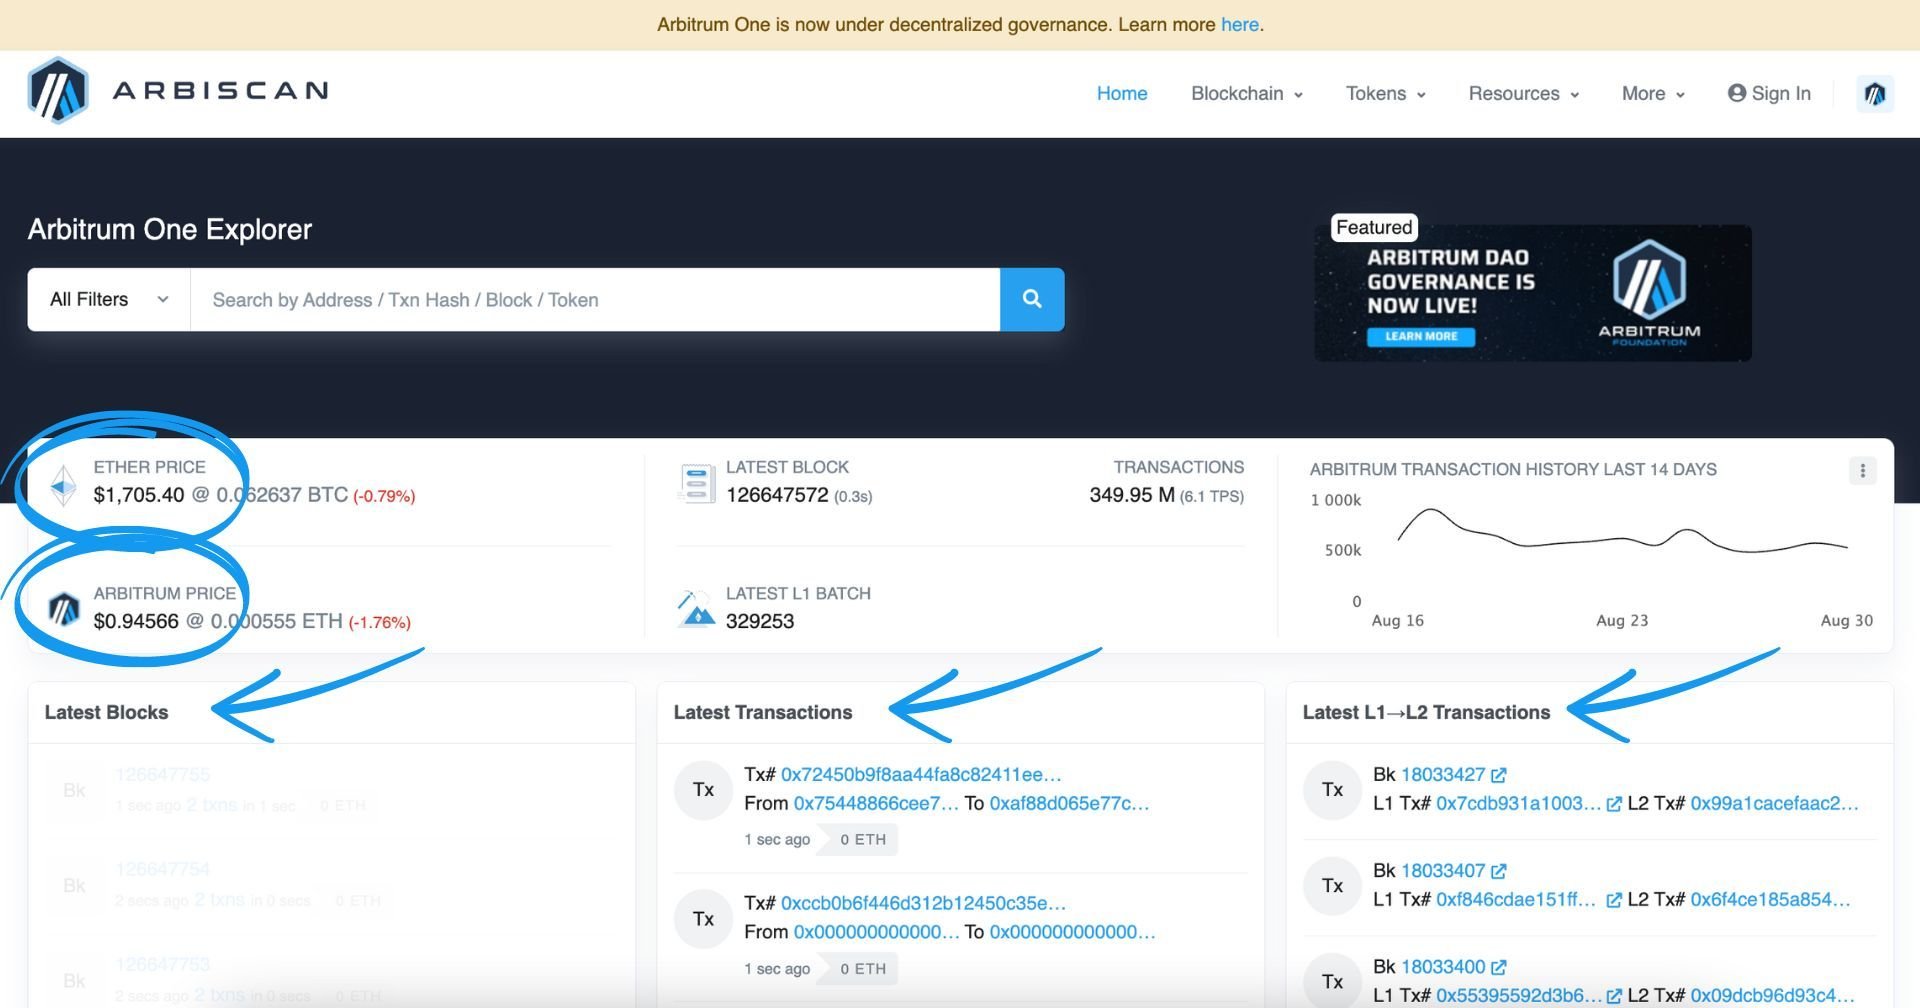
The homepage contains an overview of all the data available: latest blocks, latest transactions, current ETH price, current Abritrum price, as well as some basic stats.
The ‘Search’ bar at the top lets you look up individual addresses, tokens, smart contracts, transactions, or blocks.
How to Read an Address Page on Arbiscan
You can look at an individual address by using the Search function. No matter if it is a wallet address you’re after or a smart contract, you’ll be able to navigate to the address page:
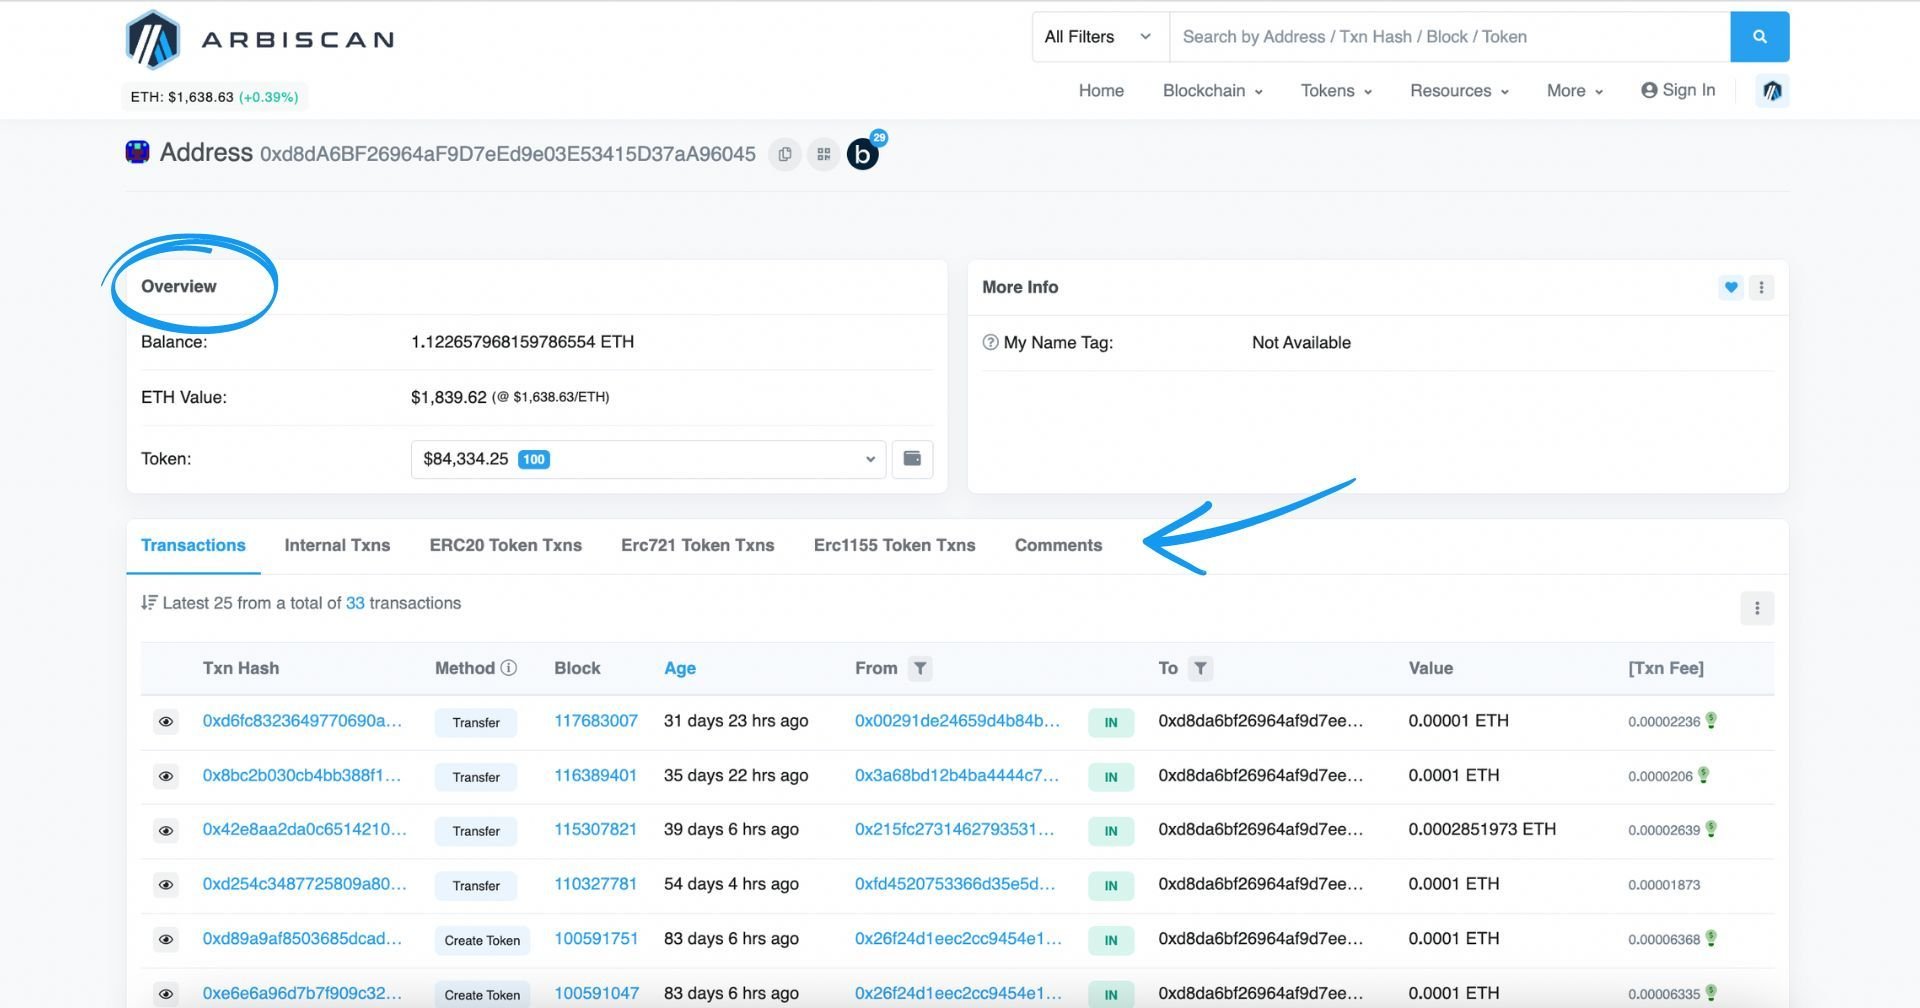
There, you will see an overview of the address, with its balance in ETH, the value of the ETH held, and the balance by token.
Underneath, you can see the activity of the address in terms of transactions. The transactions are displayed separately by type:
- Transactions: triggered by external addresses
- Internal Txns: triggered by smart contracts
- ERC-20, ERC-721 & ERC-1155 Token Txns: any transactions involving fungible tokens (ERC-20), non-fungible tokens (ERC-721 or NFTs) or multi token standard (ERC-1155)
How to Read Transactions on Arbiscan
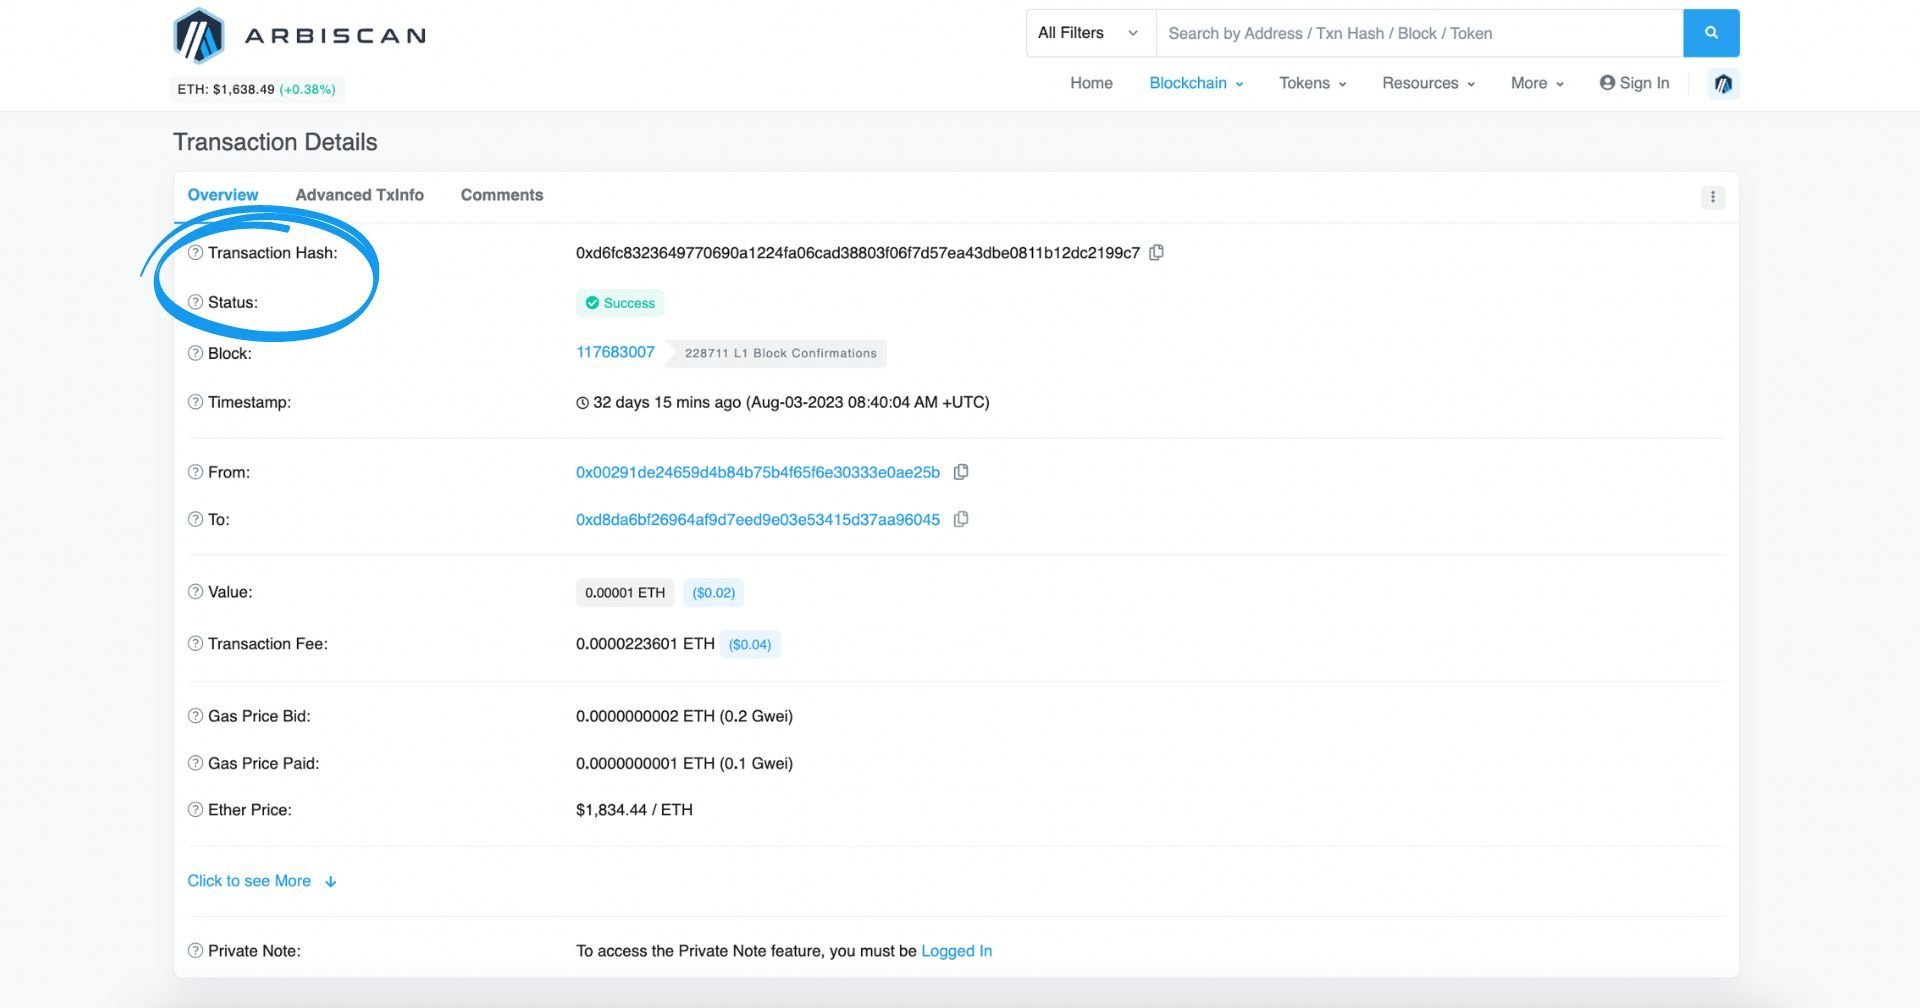
The search field is super helpful when looking for transactions. When you open one, you will see its overview containing the following: the unique transaction ID called a ‘hash’, the status, which block it’s from and what the time stamp is, the initiating and the destination address (or the smart contract it interacted with), and lastly: the gas fees paid the transaction. Here is what it looks like:
How to Read Transaction Status on Arbiscan
Using the transaction hash, you can check the status of the transaction. The status can be:
- pending (it means it hasn’t been written on a block yet but is in the process of doing so);
- successful (already written on a block, on-chain);
- failed. Transactions can fail/be rejected due to gas fees or technical 3rd party issues (e.g., dApps), in which case they are not executed on-chain, and the operation must be repeated.
How to Read Blocks on Arbiscan
Blocks on Arbiscan are numbered as they appear, with the oldest being 0, the next 1, and so on. The number of the block is called a Height. This is what a block looks like:
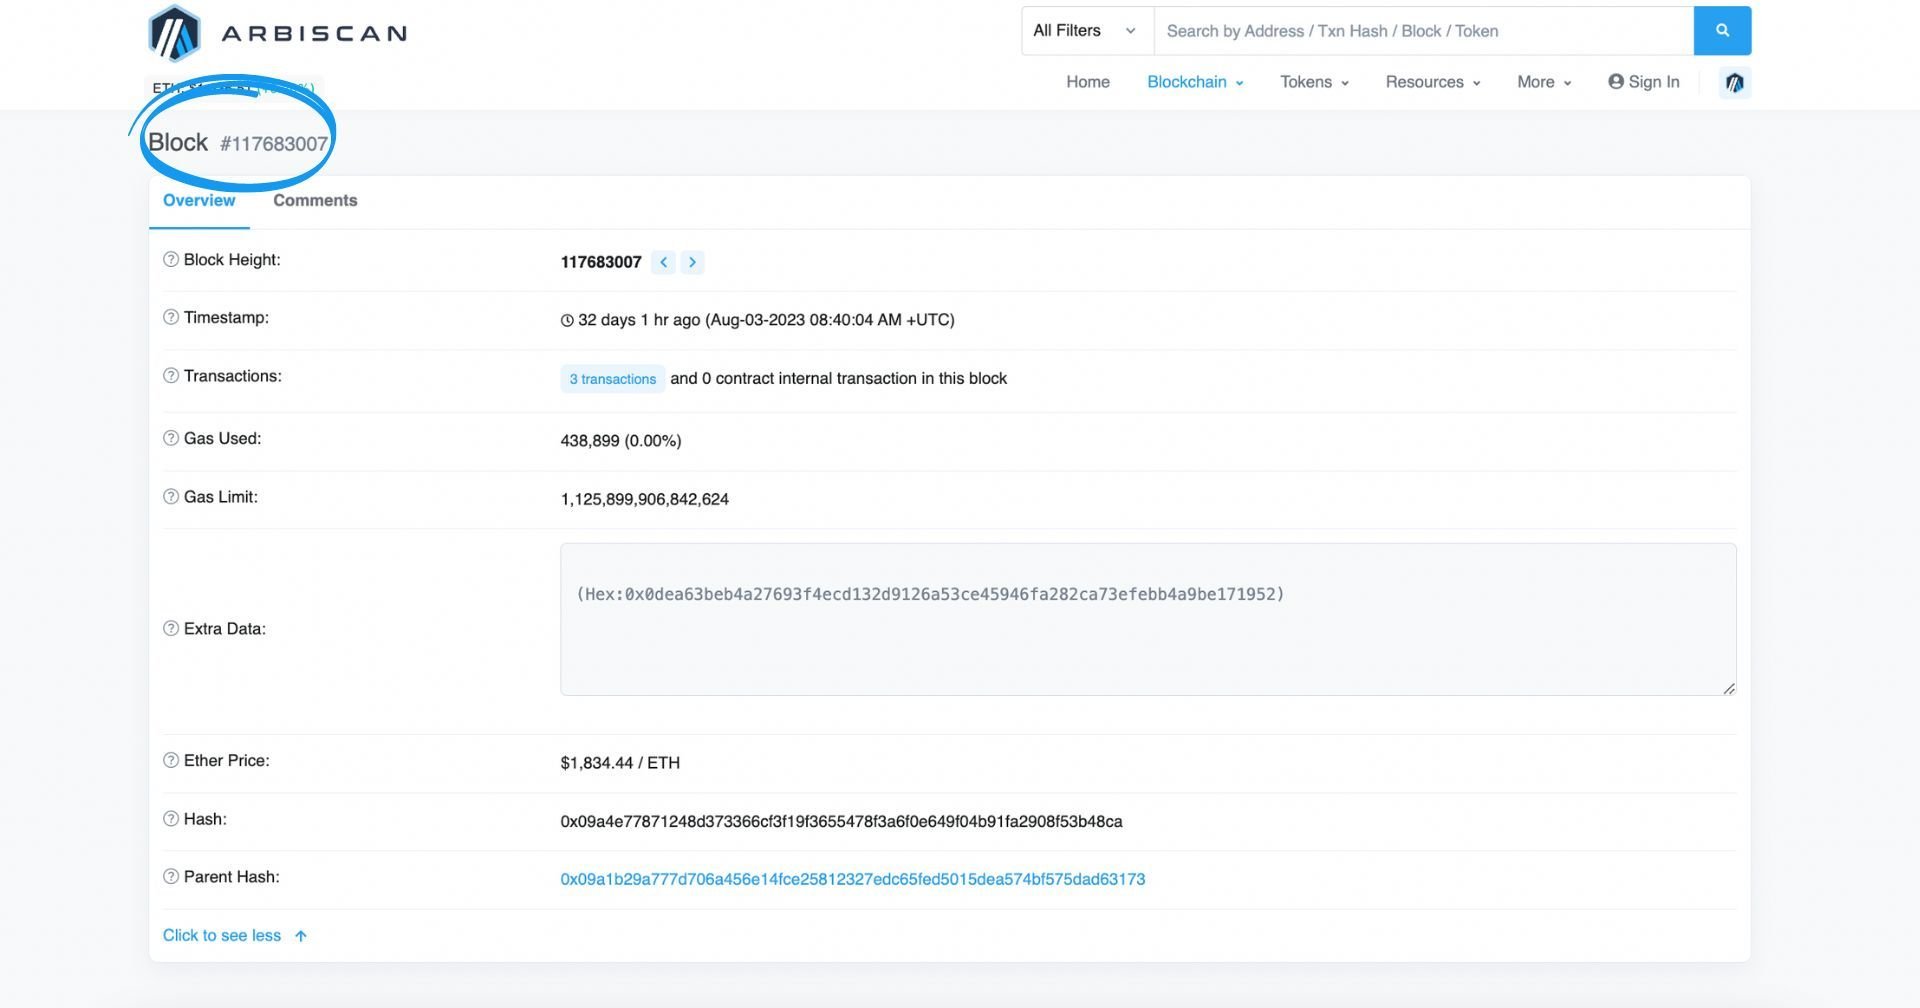
The block records data such as the time it was mined, how many transactions it’s made of, what gas was used, etc.
How to Read Smart Contracts on Arbiscan
There are a few things you could do with smart contracts on Arbiscan. The first thing is to check if the code is verified, and you can do this one of two ways. You can check all verified contracts in a neat list when you click on ‘Blockchain’ and then Verified Contracts:
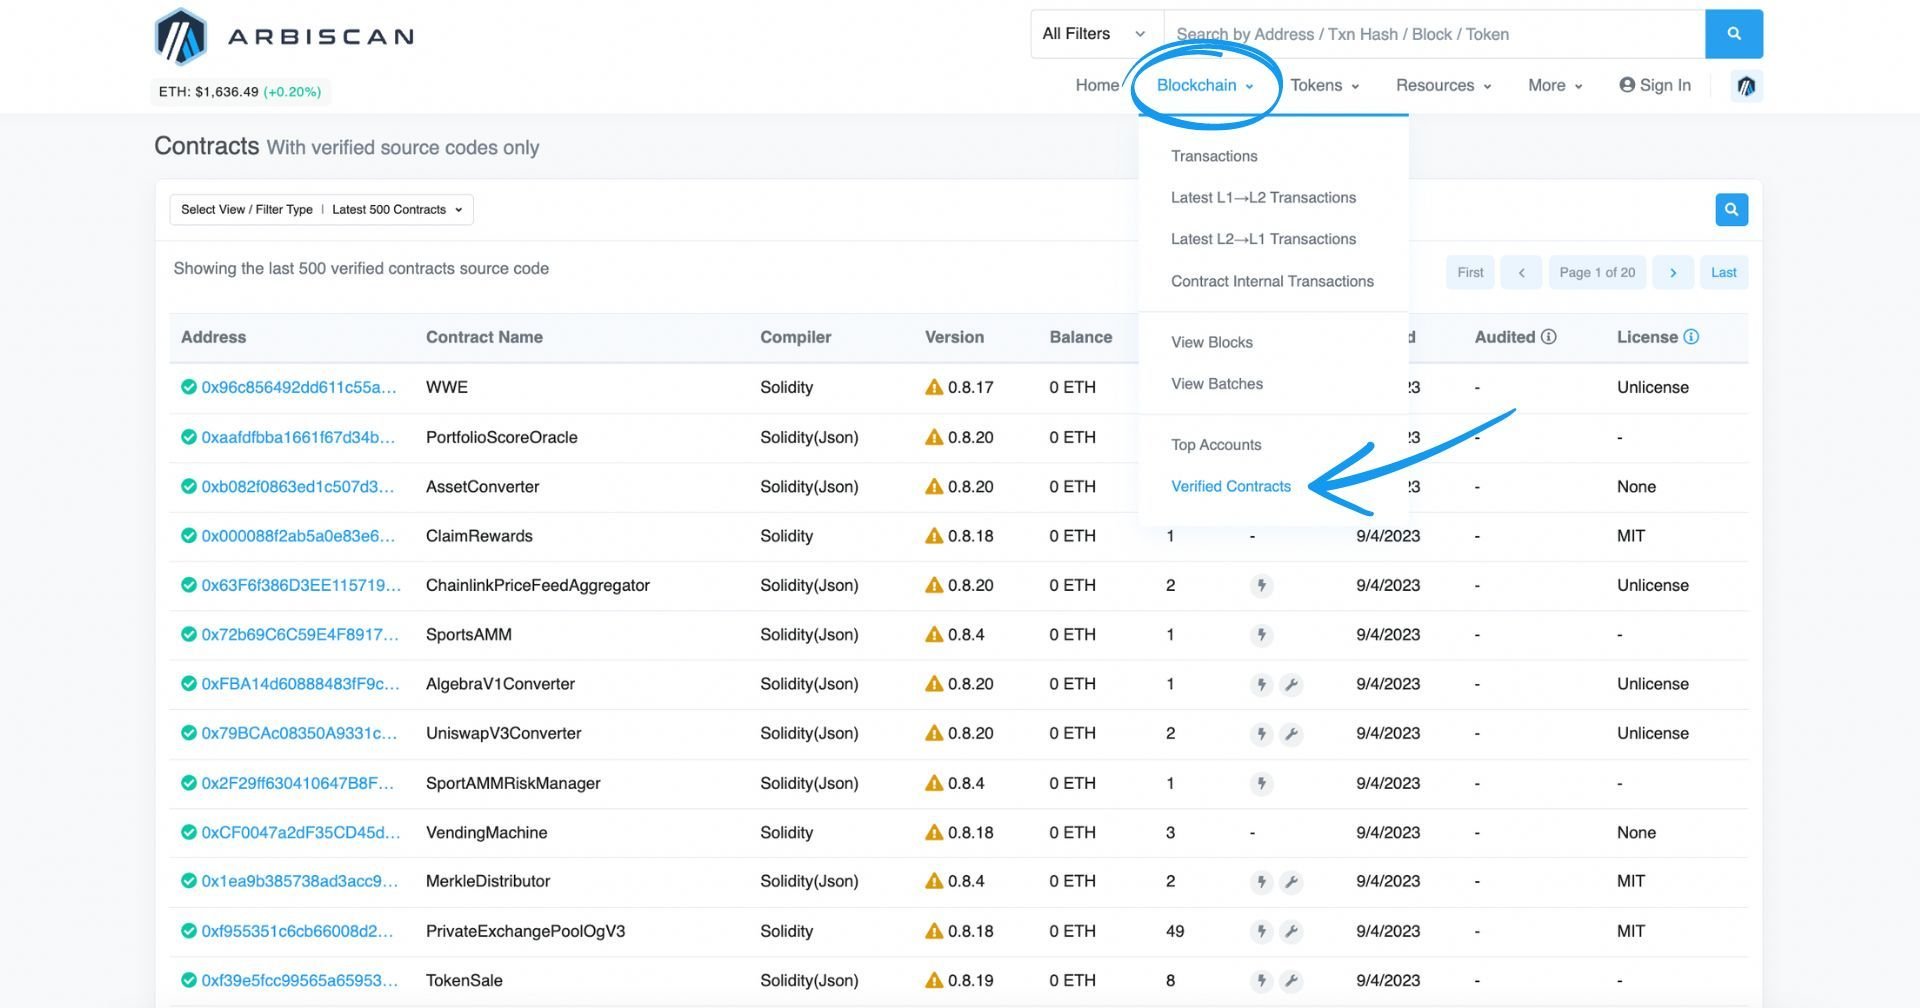
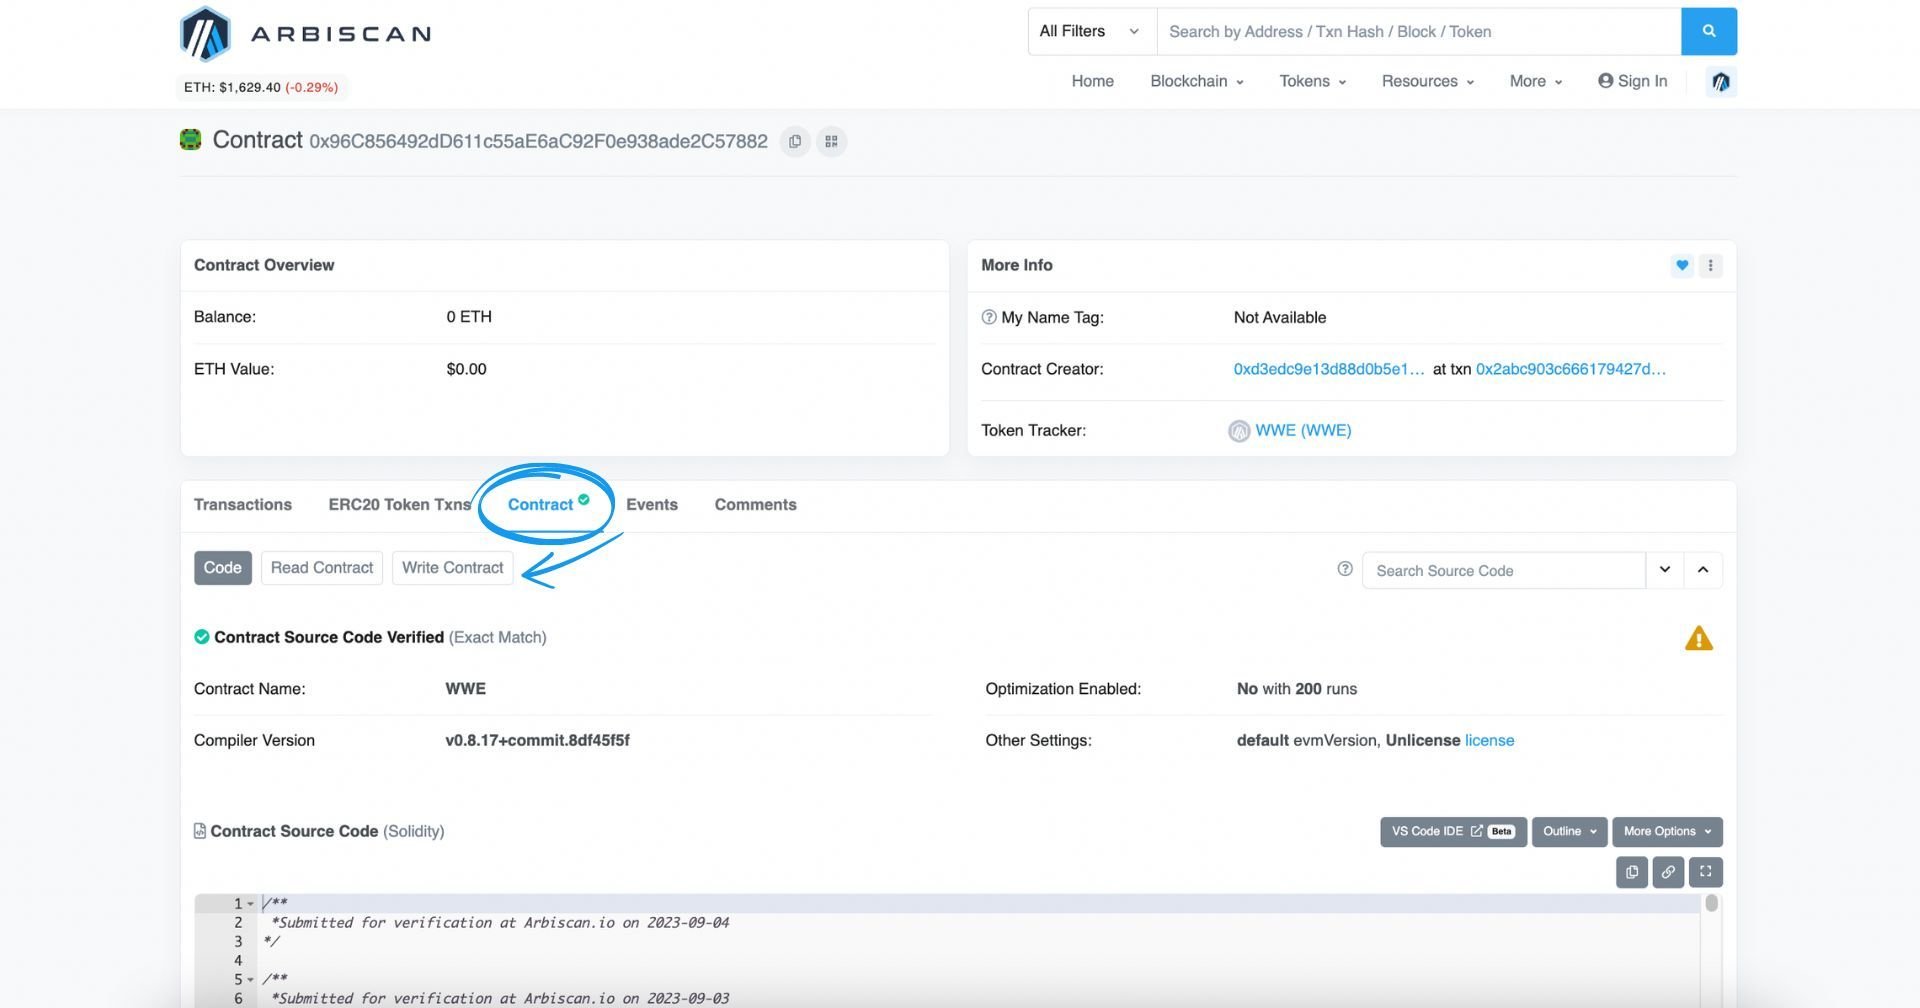
Alternatively, you can open an individual smart contract, where under 'Contract’ -> ‘Code’, you can check whether the code is verified.
You can also check the actual source code of the contract (Read Contract) or write the smart contract (a.k.a make any changes to it), too:
How to Read Gas Information on Arbiscan
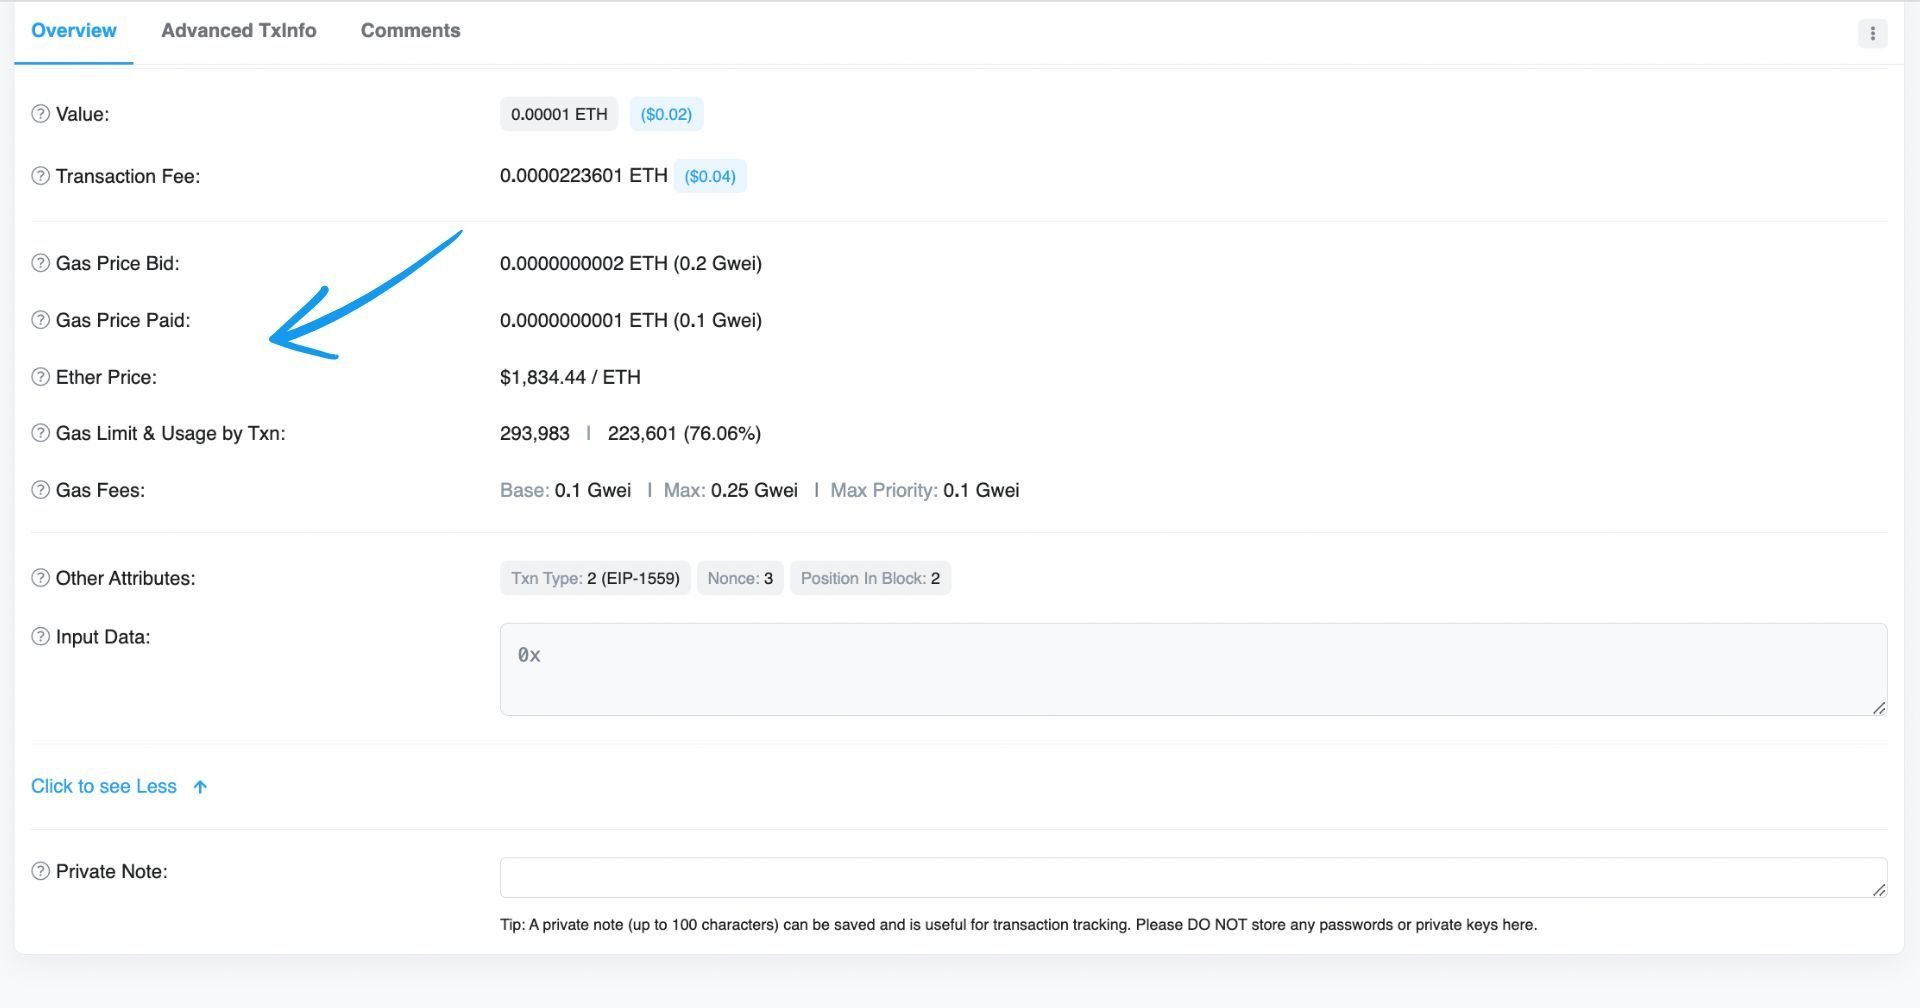
When you are checking out a transaction on Arbiscan, you will see a gas price and other gas details. Gas is a measure of the amount of computation and storage required to execute a change on the blockchain through a transaction. Here’s what information you can see in regards to gas:
- Gas Price Bid: The gas price bid submitted with the transaction
- Gas Price Paid: The actual gas price paid
- Ether Price: The closing price of ETH on the day of the transaction
- Gas Limit & Usage by Txn: Maximum of gas allocated for the transaction & the amount eventually used. Contracts involve higher values than simple token transfers.
- Gas Fees: Base fee refers to the network’s base fee at the time of the block, while Max fee and Max priority fee refer to the maximum amount a user is willing to spend on the transaction & give to the miner, respectively.
How to Read Tokens on Arbiscan
You can look up ERC-20 (non-fungible tokens), ERC-721 (NFTs), as well as ERC-1155 (multi-token standard) tokens on Arbiscan. When you go to a token page (from the Search, e.g.), you will see a token Overview, a Profile Summary, as well as additional information further down:
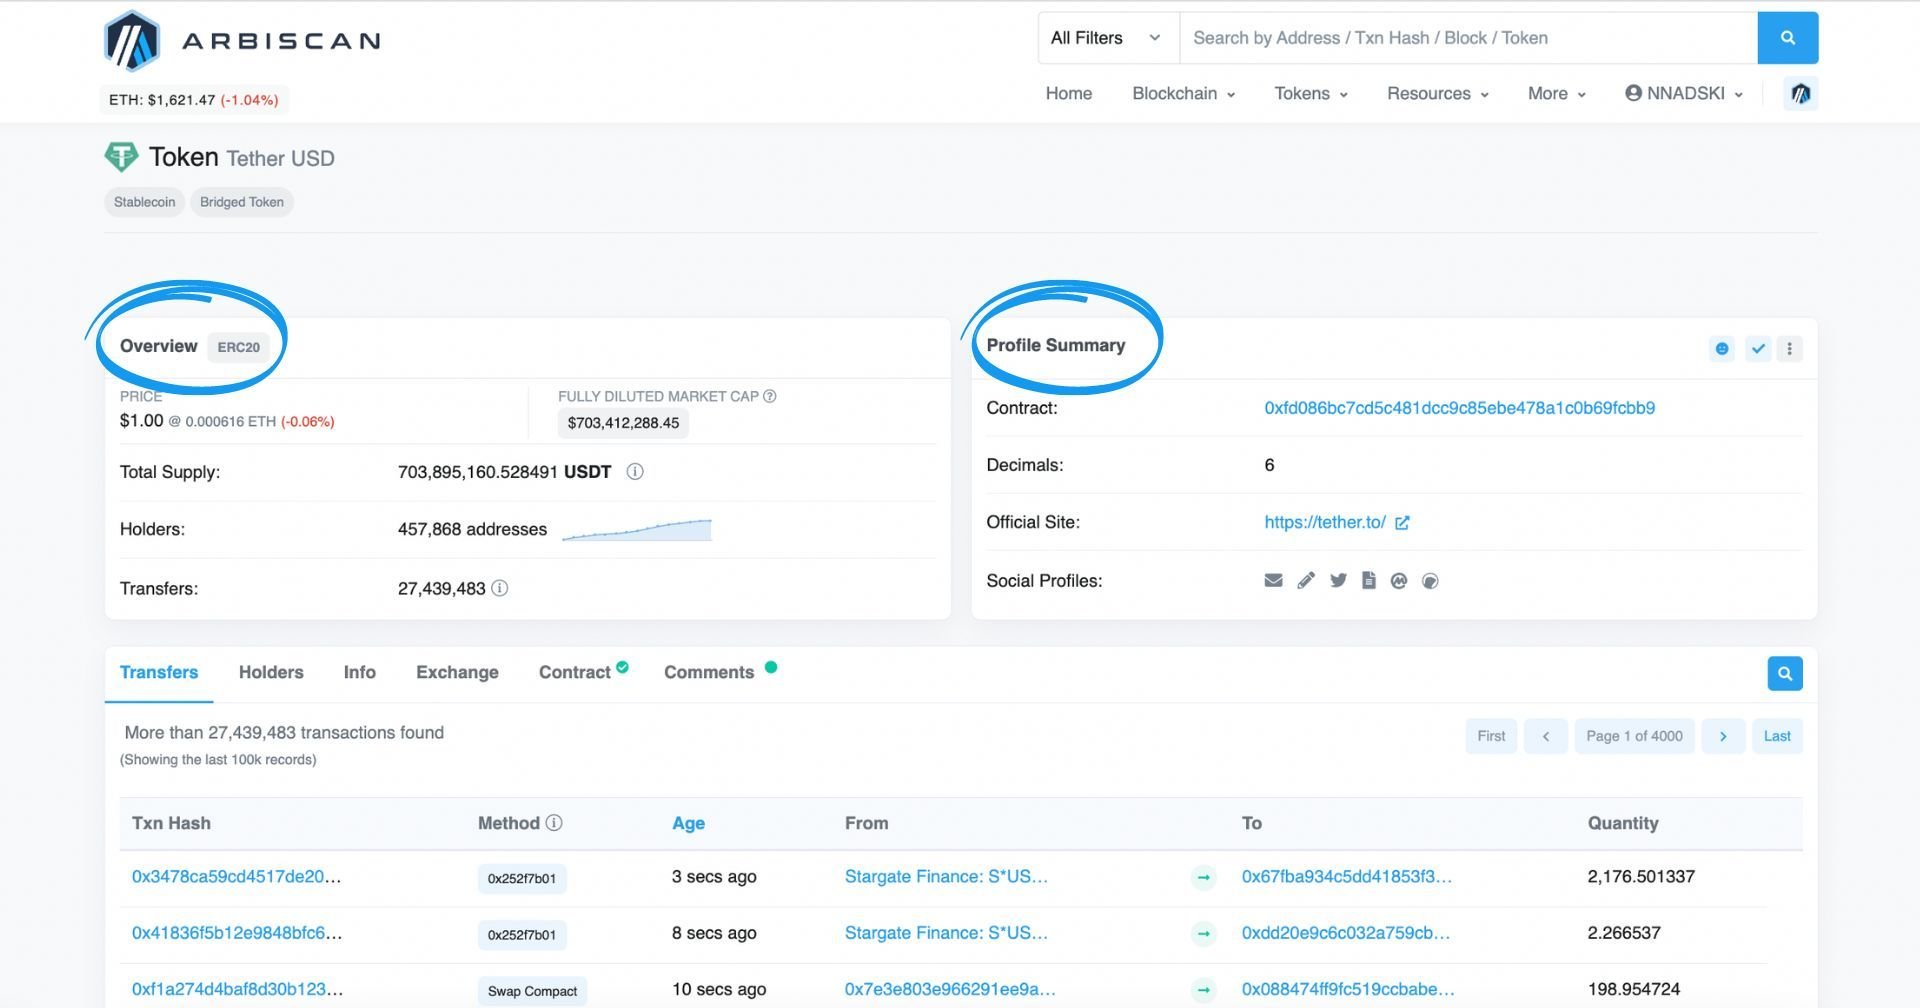
The overview will tell you which type of token it is (in this case, ERC-20), the price of the token, the total supply, and the number of holders and transfers, while the Profile Summary will give you information about the contract address, decimals, site of the project, as well as social profiles.
You can get additional information, such as transfers, holders, exchanges, and the smart contract source code further down the page.
How to Find Token Decimals on Arbiscan?
- Search for the token you are interested in in the search bar, and click the search button.
- The token decimals are displayed under the Profile Summary on your right-hand side, beneath the token's contract address.
How to Review and Revoke Token Approvals on Arbiscan
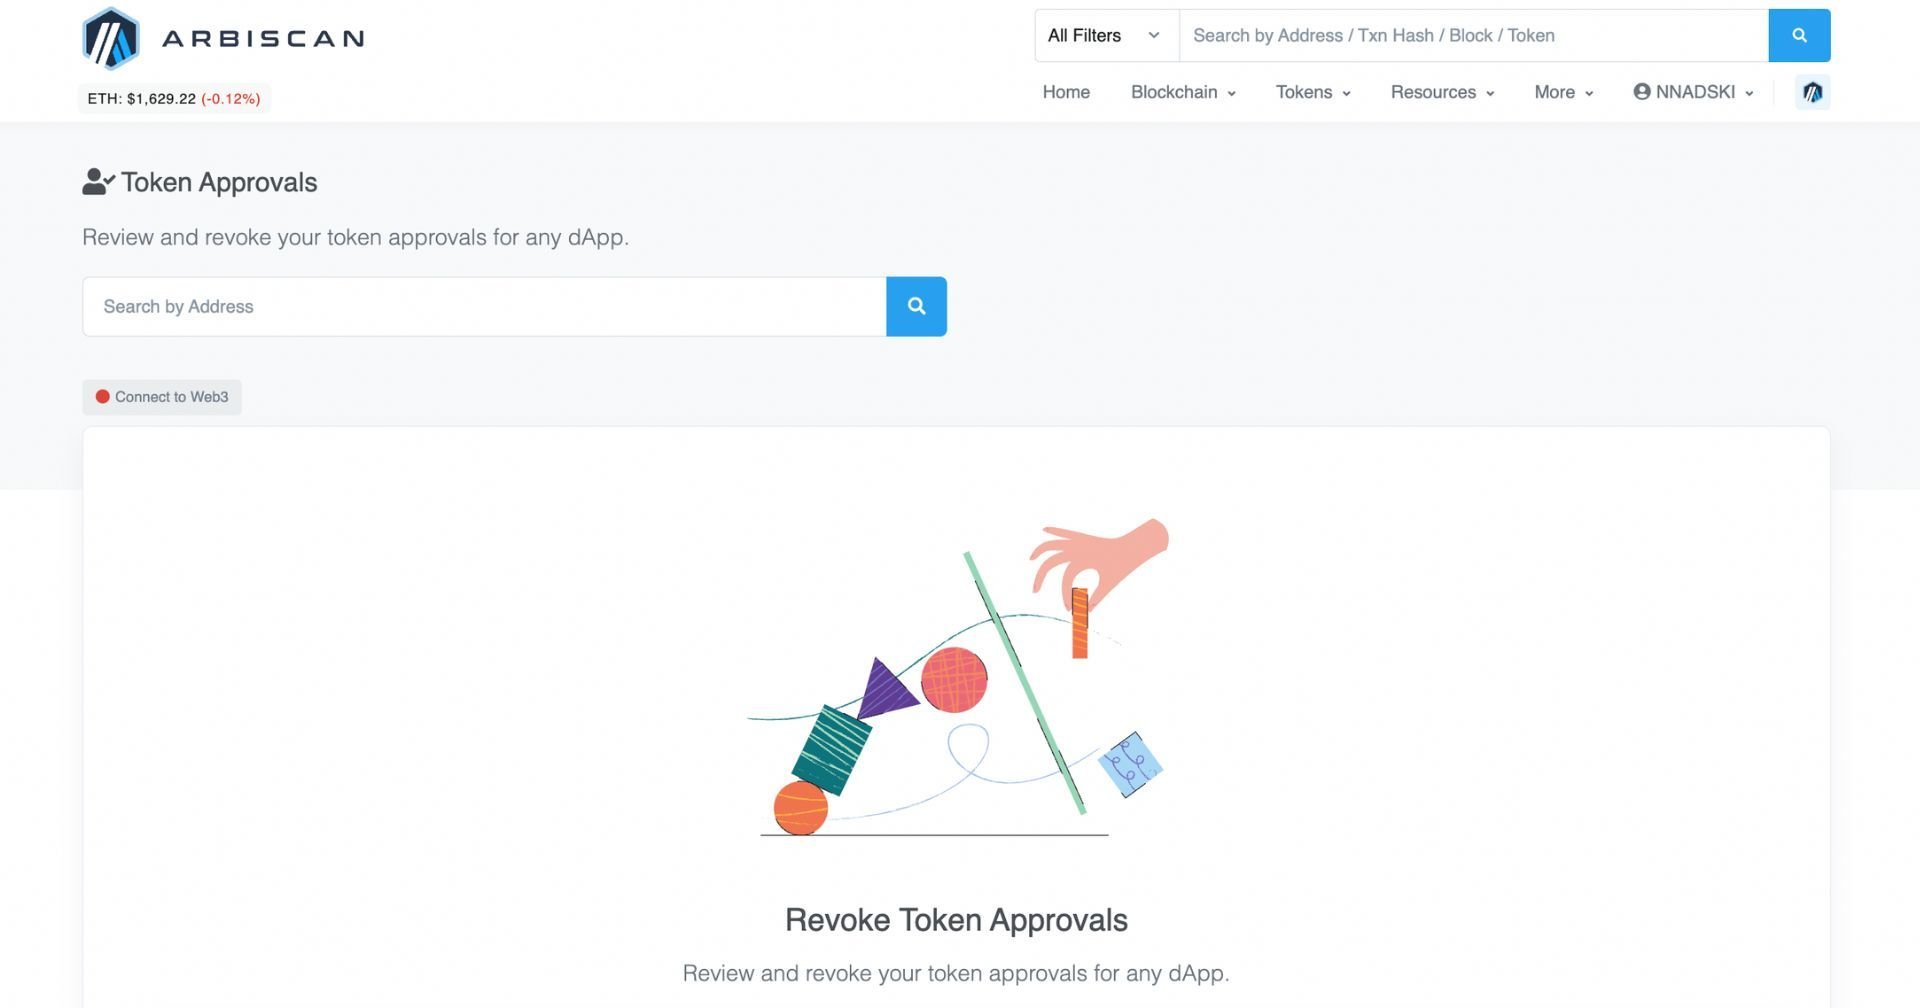
Arbiscan also allows you to review and revoke token approvals for dApps. Simply go to the Token Approvals page, connect your wallet, and you will be able to see what token approvals you have for both ERC-20 and ERC-721. You will also be able to revoke any approvals from there:
How to Track NFTs on Arbiscan
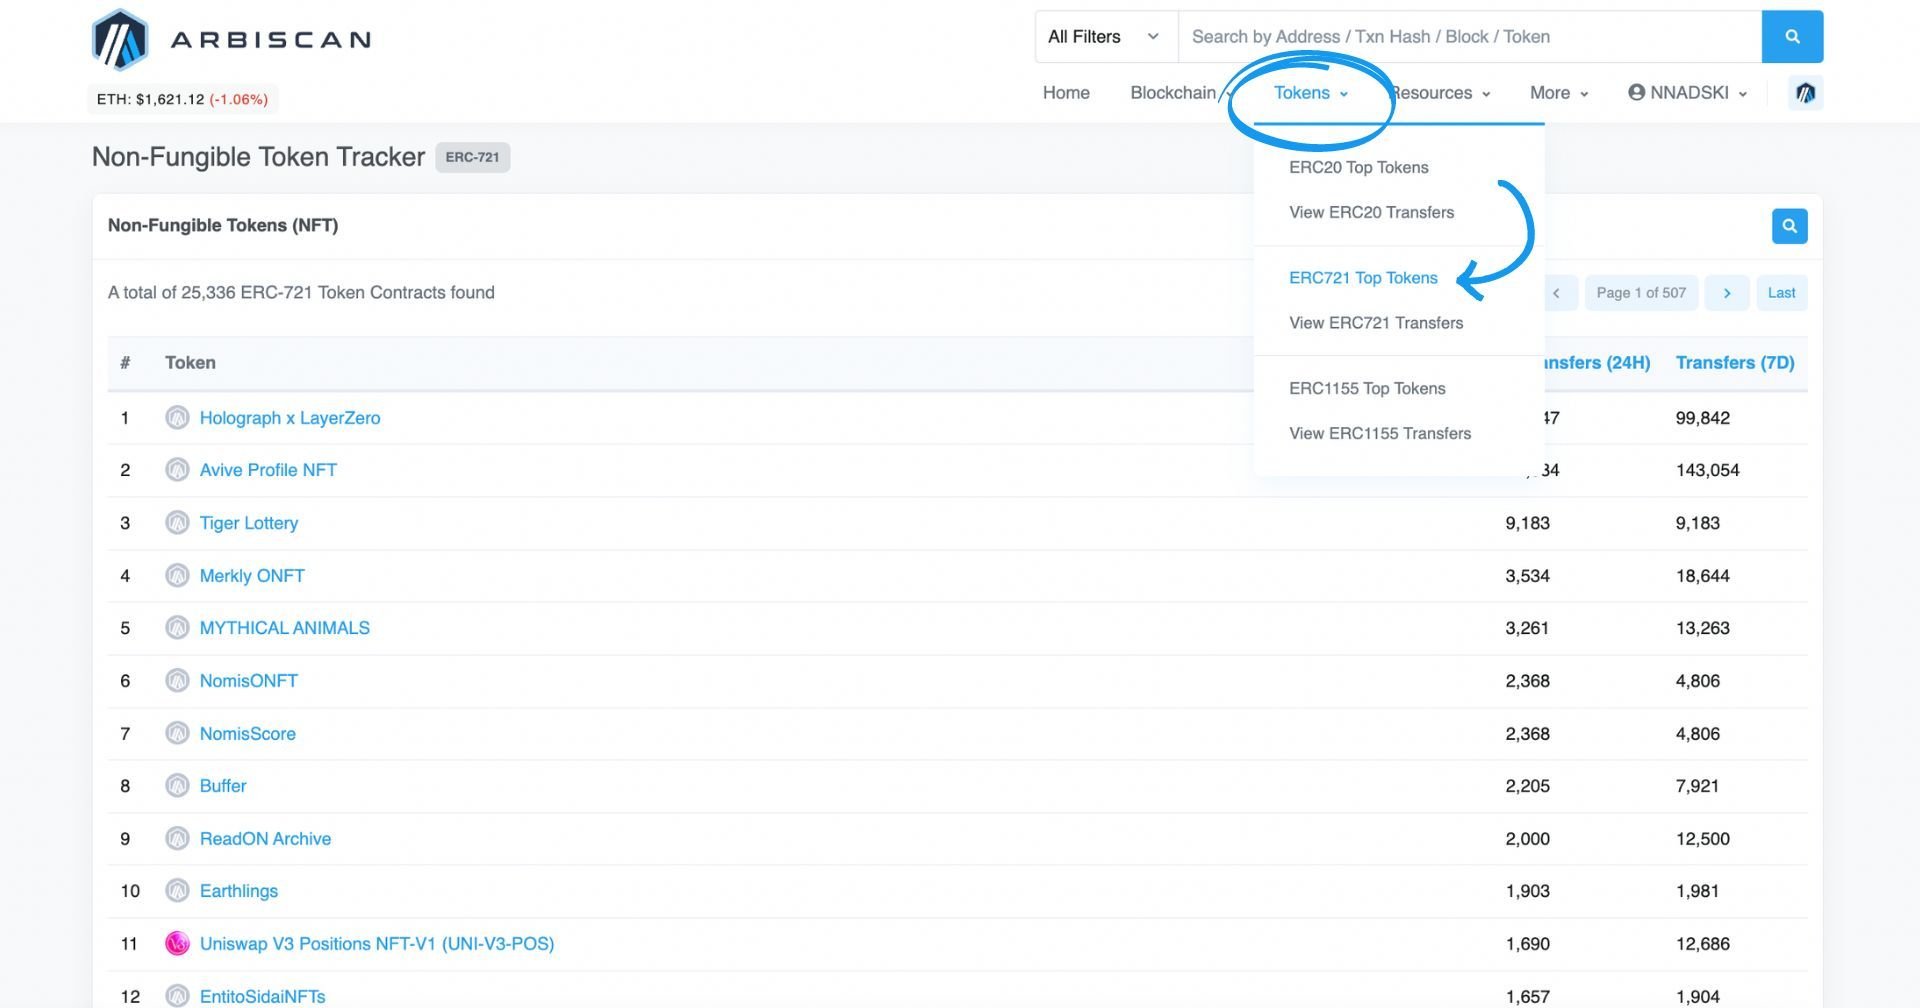
You can look up NFTs on Arbiscan under ‘Top ERC-721 tokens’. There, you will see a list of the top NFTs with information about transfers either in the last 24 hours or the last 7 days. You can find more information about them by clicking on the token name - then you’ll see the full info on the contract.
Useful Profile Features of Arbiscan
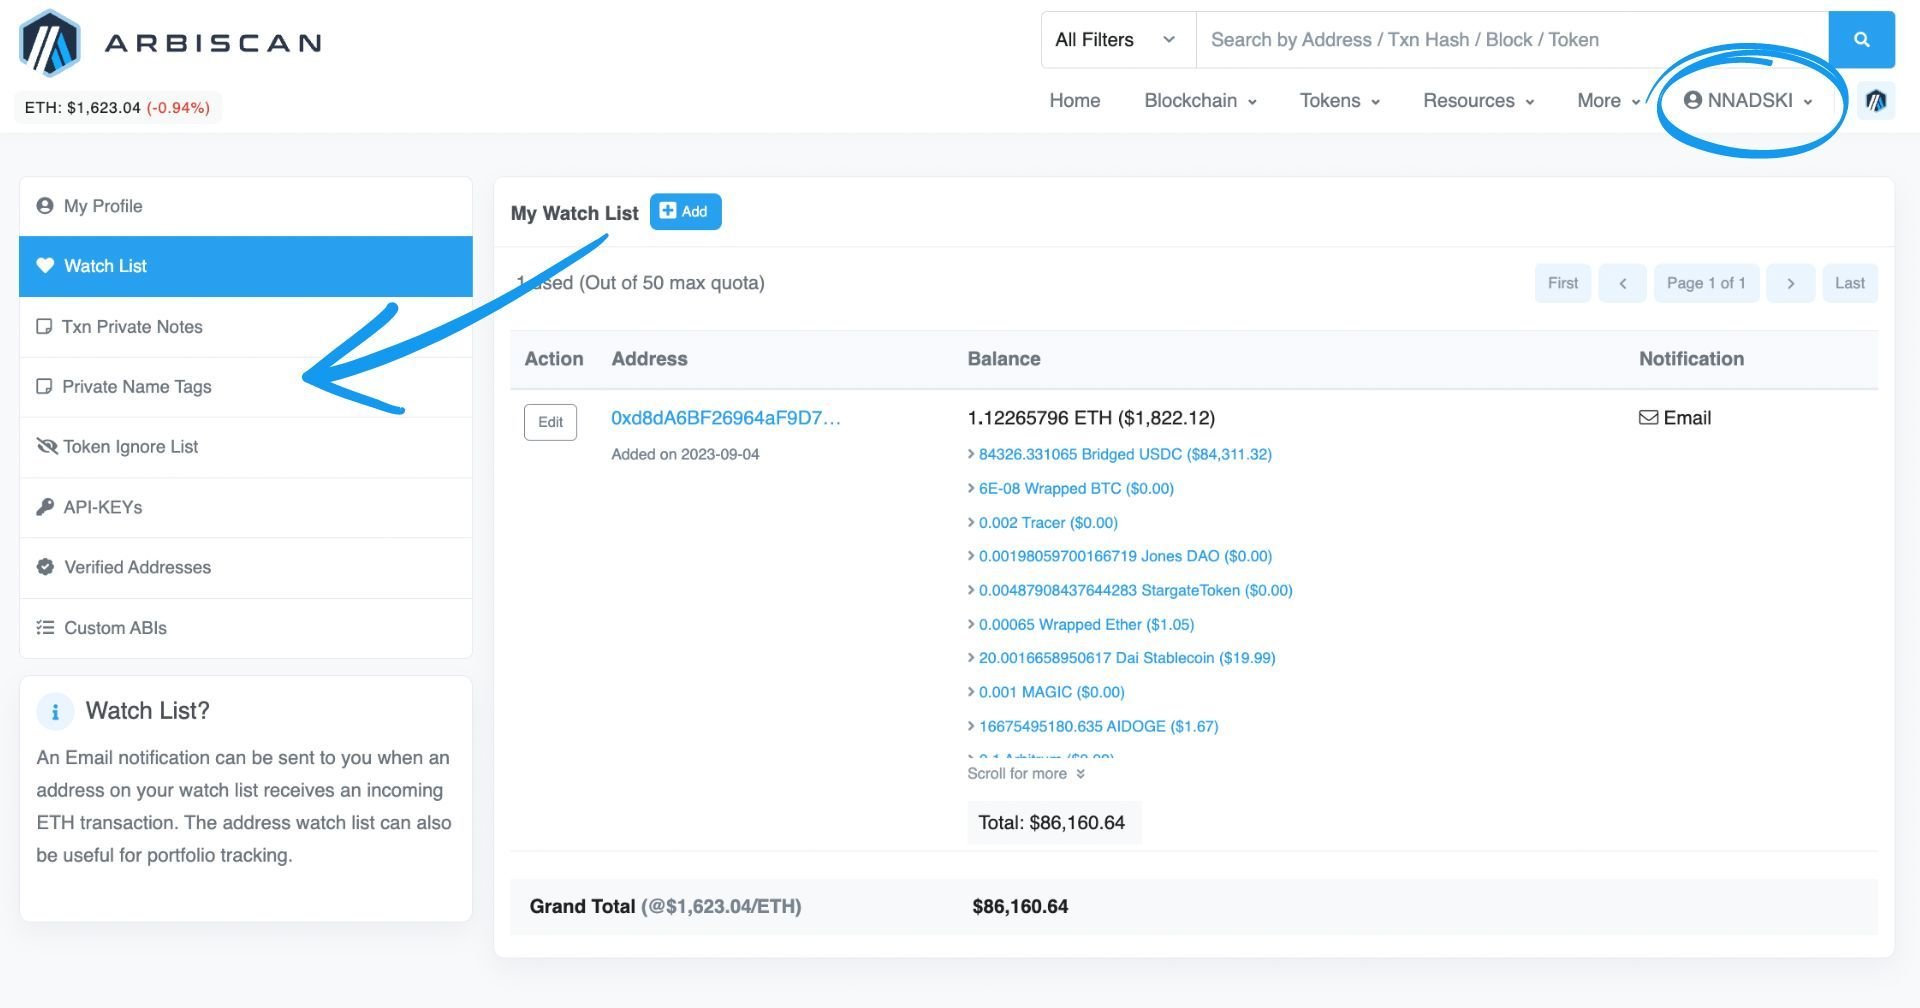
You can use Arbiscan without registering an account. Some useful features are only available to registered users, so we recommend you consider opening an account.
Check them out:
Watchlist
You can add addresses to your Watch list if you’d like to receive notifications when they perform transactions. You can subscribe to incoming or outgoing transactions or both.
Transaction Private Notes
If you want to mark or label any specific or important transaction, you can add a note to it. The transactions with private notes will appear under your profile, and you will be able to see your notes directly in the Transaction Overview, too.
Private Name Tags
If you want to name your own wallets or those of your friends, you can give them human-readable names here. It becomes like an ‘Address Book’ in a way. Whether it’s your own wallet addresses or those of friends or colleagues, you can easily check who an address belongs to if you have set a name tag.
Token Ignore List
You can use this feature to hide tokens from showing up in token-holding lists across the website. When a token is hidden, its price will not contribute to the address' total token value.
In Summary
This guide should give you sufficient information to navigate Arbiscan confidently and to be able to use the information available to its full potential. Additional resources are available if you want to learn more about transactions, e.g., you can check Etherscan’s knowledge base, which will help you understand Arbiscan better, too.
Related articles
Interested in Ambire? Follow us:
Discord | X (Twitter) | Reddit | GitHub | Telegram | Facebook
